The Naturalist’s Journal is a sub collection for the Chuka and Chamapawat Vol.3: Tigris Collection. This collection has 16 parts consisting of one crafted item and 15 journal entries.
Continue reading “GW2: Chuka and Champawat Vol. 3: Tigris: Naturalist’s Journal”Category: Legendary Weapons
GW2: Chuka and Champawat Vol. 3: Tigris
Crafting Tigris, the Precursor weapon to Chuka and Champawat, is the next major stage towards creating your Legendary Weapon. However, we need to complete this collection first. There are 20 parts to this collection, 2 of which involve a separate collection which I will write my next Chuka post on.
If you haven’t completed the previous collections, please refer to my other guides for The Hunt and The Ambush as these need to be completed before the Tigris collection can be unlocked.
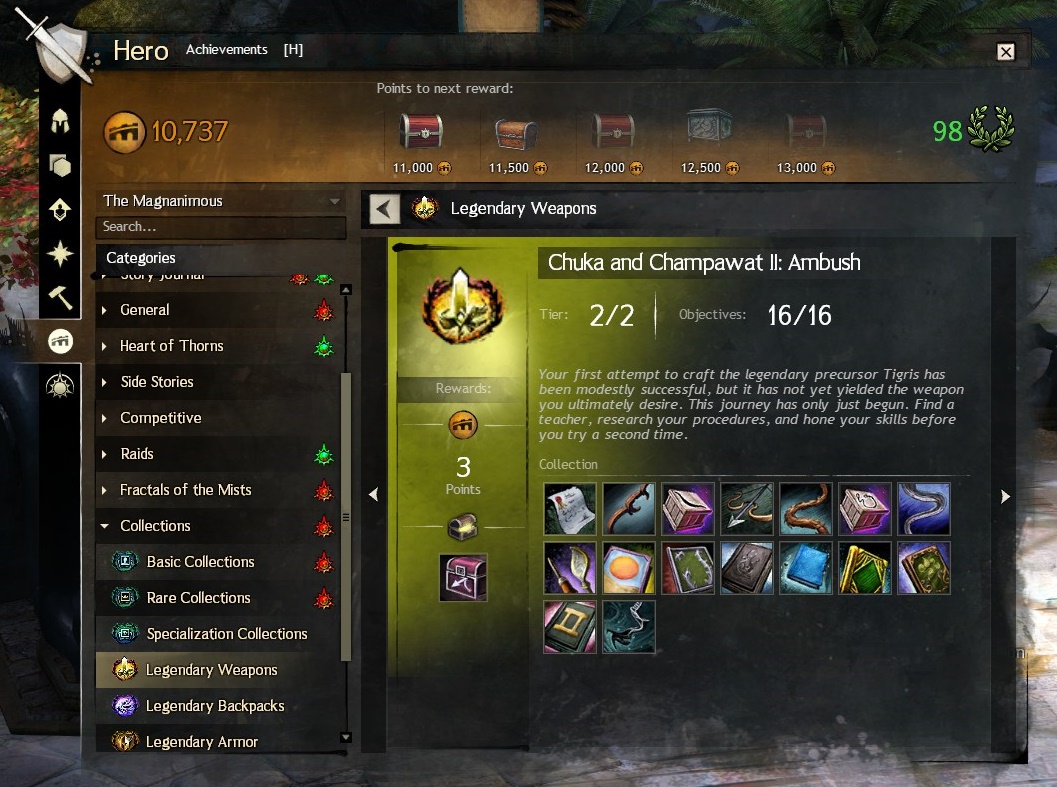
Continue reading “GW2: Chuka and Champawat Vol. 3: Tigris”GW2: Chuka and Champawat Vol 2: Ambush
Moving on to the next stage in crafting this Legendary Short-Bow. Unfortunately this section is all about crafting and collecting items to give to people so it’s probably the least interesting and most difficult part of the Chuka and Champawat collection (minus crafting the actual legendary of course)!
First of all, you need to have completed the first collection Chuka and Champawat Vol 1: The Hunt to be able to have access to the Ambush collection and you need to have a Huntsman at least level 450.
There are 16 parts to this collection, some parts have to be done in a certain order. Here’s what it looks like in the achievements tab:
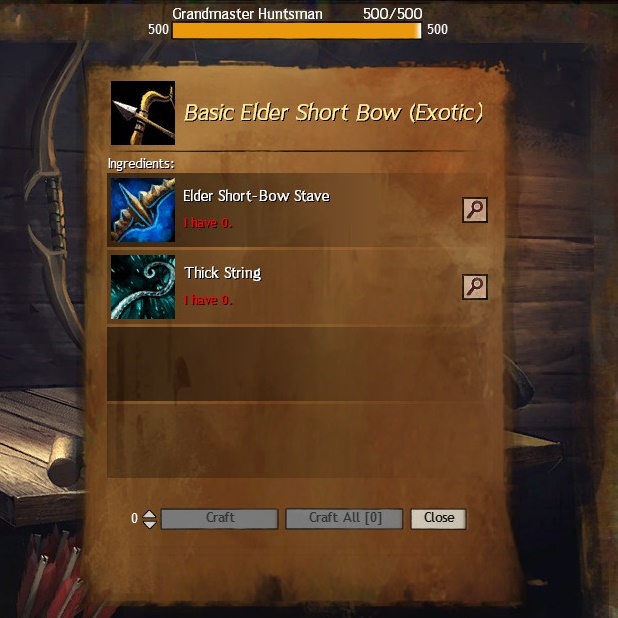
1. Basic Short-Bow Requisition – Craft 175 Basic Elder Short-Bows and give them to a Master Huntsman (the vendor stood next to the Huntsman crafting station). To unlock the recipe speak to the Huntsman vendor first. Each bow requires:
- Elder Short-Bow Stave (4 Elder Planks per Stave, 3 Elder Logs per plank)
- Thick String (3 Cured Thick Leather Squares per String, 4 Thick Leather Sections per Square).
2. The Art of Woodworking: Short-Bow Edition Vol 2 – After the Basic Short-Bow Requisition stage (no.1) has been completed, you can now begin the Art of Woodworking sections. You will need:
- 10 Green Short-Bow Staves (4 Planks per Stave, 3 Logs per Plank)
- 10 Soft Short-Bow Staves (4 Planks per Stave, 2 Logs per Plank)
- 10 Seasoned Short-Bow Staves (4 Planks per Stave, 3 Logs per Plank)
- 10 Hard Short-Bow Staves (4 Planks per Stave, 3 Logs per Plank)
- 10 Elder Short-Bow Staves (4 Planks per Stave, 3 Logs per Plank)
- 10 Ancient Short-Bow Staves (4 Planks per Stave, 3 Logs per Plank)
- 1 Spiritwood Short-Bow Stave (5 Piles of Crystalline Dust, 10 Thermocatalytic Reagents and 2 Spiritwood Planks). Recipe for 1 Spiritwood Plank below:
- 1 Glob of Elder Spirit Residue (50 Elder Planks, 1 Glob of Ectoplasm, 10 Thermocatalytic Reagents)
- 20 Soft Wood Planks (2 Soft Logs per plank)
- 10 Seasoned Wood Planks (3 Seasoned Logs per Plank)
- 20 Hard Wood Planks (3 Hard Logs per Plank)
Once all have been crafted, give them to the Master Hunstman to complete this section.
3. Elder Short-Bow Stave Requisition – Craft another 175 Elder Short-Bow Staves after the Basic Short-Bow Requisition section has been completed. Only the Staves, not complete bows with strings (although the Thick Strings will be needed later on). If the Staves are crafted into bows they will not count!
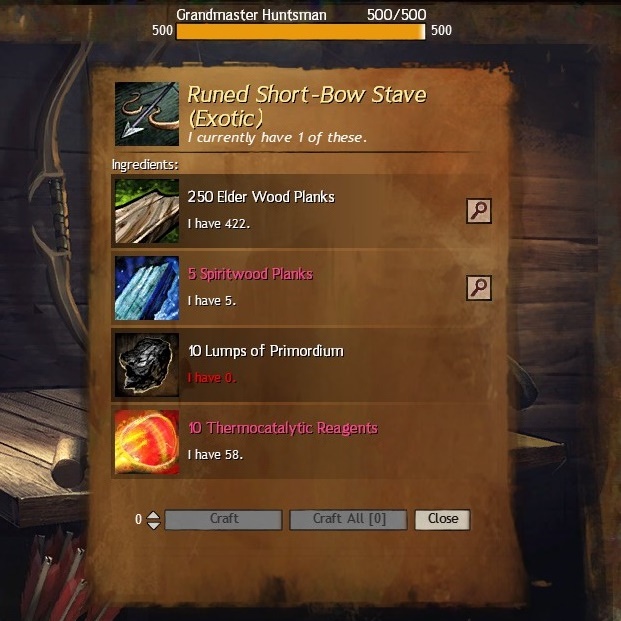
4. Runed Short-Bow Stave – Craft one of these using the recipe and it will be added to your inventory. You will need:
- 250 Elder Wood Planks (3 Elder Logs per plank)
- 5 Spiritwood Planks (per Plank):
- 1 Glob of Elder Spirit Residue (50 Elder Planks, 1 Glob of Ectoplasm, 10 Thermocatalytic Reagents)
- 20 Soft Wood Planks (2 Soft Logs per plank)
- 10 Seasoned Wood Planks (3 Seasoned Logs per Plank)
- 20 Hard Wood Planks (3 Hard Logs per Plank)
- 10 Lumps of Primordium (Bought from Master Huntsman)
- 10 Thermocatalytic Reagents (Bought from Master Huntsman)
5. The Art of Tanning: Short-Bow String Edition Vol 2 – After completing Thick Short-Bow String Requisition (no.6), you can now begin this section. You will need:
- 10 Rawhide Strings (2 Squares per String, 2 Sections per Square)
- 10 Thin Strings (3 Squares per String, 2 Sections per Square)
- 10 Coarse Strings (3 Squares per String, 2 Sections per Square)
- 10 Rugged Strings (3 Squares per String, 2 Sections per Square)
- 10 Thick Strings (3 Squares per String, 4 Sections per Square)
- 10 Hardened Strings (3 Squares per String, 3 Sections per Square)
- 1 Elonian String (5 Piles of Crystalline Dust, 10 Thermocatalytic Reagents, 3 Elonian Leather Squares). Recipe for 1 Elonian Leather Square below:
- 1 Spool of Thick Elonian Cord (50 Cured Thick Squares, 1 Glob of Ectoplasm, 10 Thermocatalyctic Reagents)
- 20 Cured Thin Leather Squares (2 Sections per Square)
- 10 Cured Coarse Leather Squares (2 Sections per Square)
- 20 Cured Rugged Leather Squares (2 Sections per Square)
Once all these have been crafted, give them to the Master Huntsman to complete the section.
6. Thick Short-Bow String Requisition – Craft another 175 Thick Strings after completing the Basic Short-Bow Requisition section. Only the Thick Strings, not the entire bows, the Staves are needed for another section.
7. Imbued Short-Bow String – Craft one of these using the recipe, then the item will be added to your inventory. You will need:
- 250 Cured Thick Leather Squares (4 Thick Sections per Square)
- 50 Cured Hardened Leather Squares (3 Hardened Sections per Square)
- 5 Elonian Leather Squares (per Square):
- 1 Spool of Thick Elonian Cord (50 Cured Thick Squares, 1 Glob of Ectoplasm, 10 Thermocatalyctic Reagents)
- 20 Cured Thin Leather Squares (2 Sections per Square)
- 10 Cured Coarse Leather Squares (2 Sections per Square)
- 20 Cured Rugged Leather Squares (2 Sections per Square)

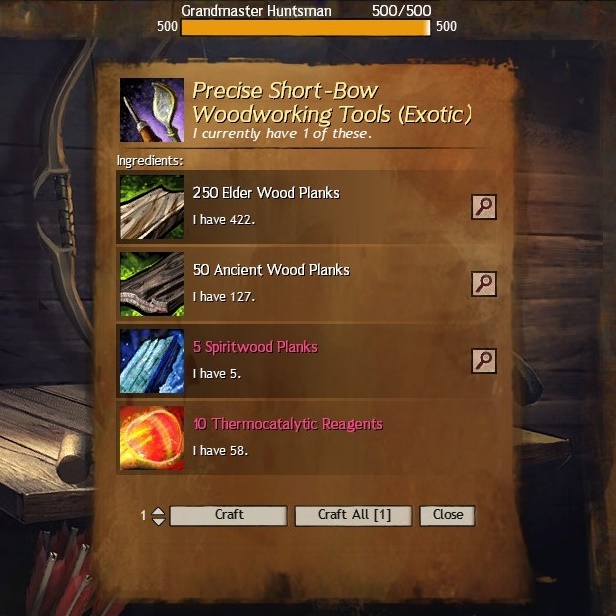
8. Precise Short-Bow Woodworking Tools – Craft one of these and the item will be added to your inventory. You will need:
- 250 Elder Wood Planks (3 Elder Logs per Plank)
- 50 Ancient Wood Planks (3 Ancient Logs per Plank)
- 5 Spiritwood Planks
- 10 Thermocatalytic Reagents
9. Desert Magics: Short-Bow Edition Vol 2 – Give 1000 Bandit Crests to Scholar Mossi found in Lion’s Arch next to Grandmaster Craftsman Hobbs. Bandit Crests are earned by completing events in the Silverwastes.
10. Jungle Magics: Short-Bow Edition Vol 2 – Give 200 Geodes to Scholar Mossi. Geodes are earned by completing events in Dry Top.
11. Old World Magics: Short-Bow Edition Vol 2 – Give 100 Obsidian Shards to Scholar Mossi. Obsidian Shard can be purchased from various vendors throughout Tyria with different currencies e.g. 21,000 karma for 10 Obsidian Shards at Cathedral of Glorious Victory in Straits of Devastation or 3 Laurels for 3 Obsidian Shards from the Laurel Merchants.
12. Ancient Water Magics: Short-Bow Edition Vol 2 – Give 100 Karka Shells to Scholar Mossi. Karka Shell are dropped by enemies in Southsun Cove, particularly in the reward chest for killing the Karka Queen.
13. Herbal Magics: Short-Bow Edition Vol 2 – Give 25 Passion Flowers to Scholar Mossi. Passion Flowers are harvested from Passiflora in Southsun Cove. The drops are random as to whether you will receive a Passion Flower from a Passiflora, but Blooming Passifloras will always drop a Passion Flower.
14. Stabilizing Magics: Short-Bow Edition Vol 2 – Give 25 Stabilizing Matrix to Scholar Mossi. Stabilizing Matrices are dropped from Fractal of the Mists Chests or can be salvaged from Ascended Rings using Ascended Salvage kits.
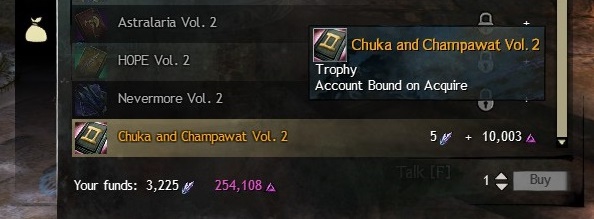
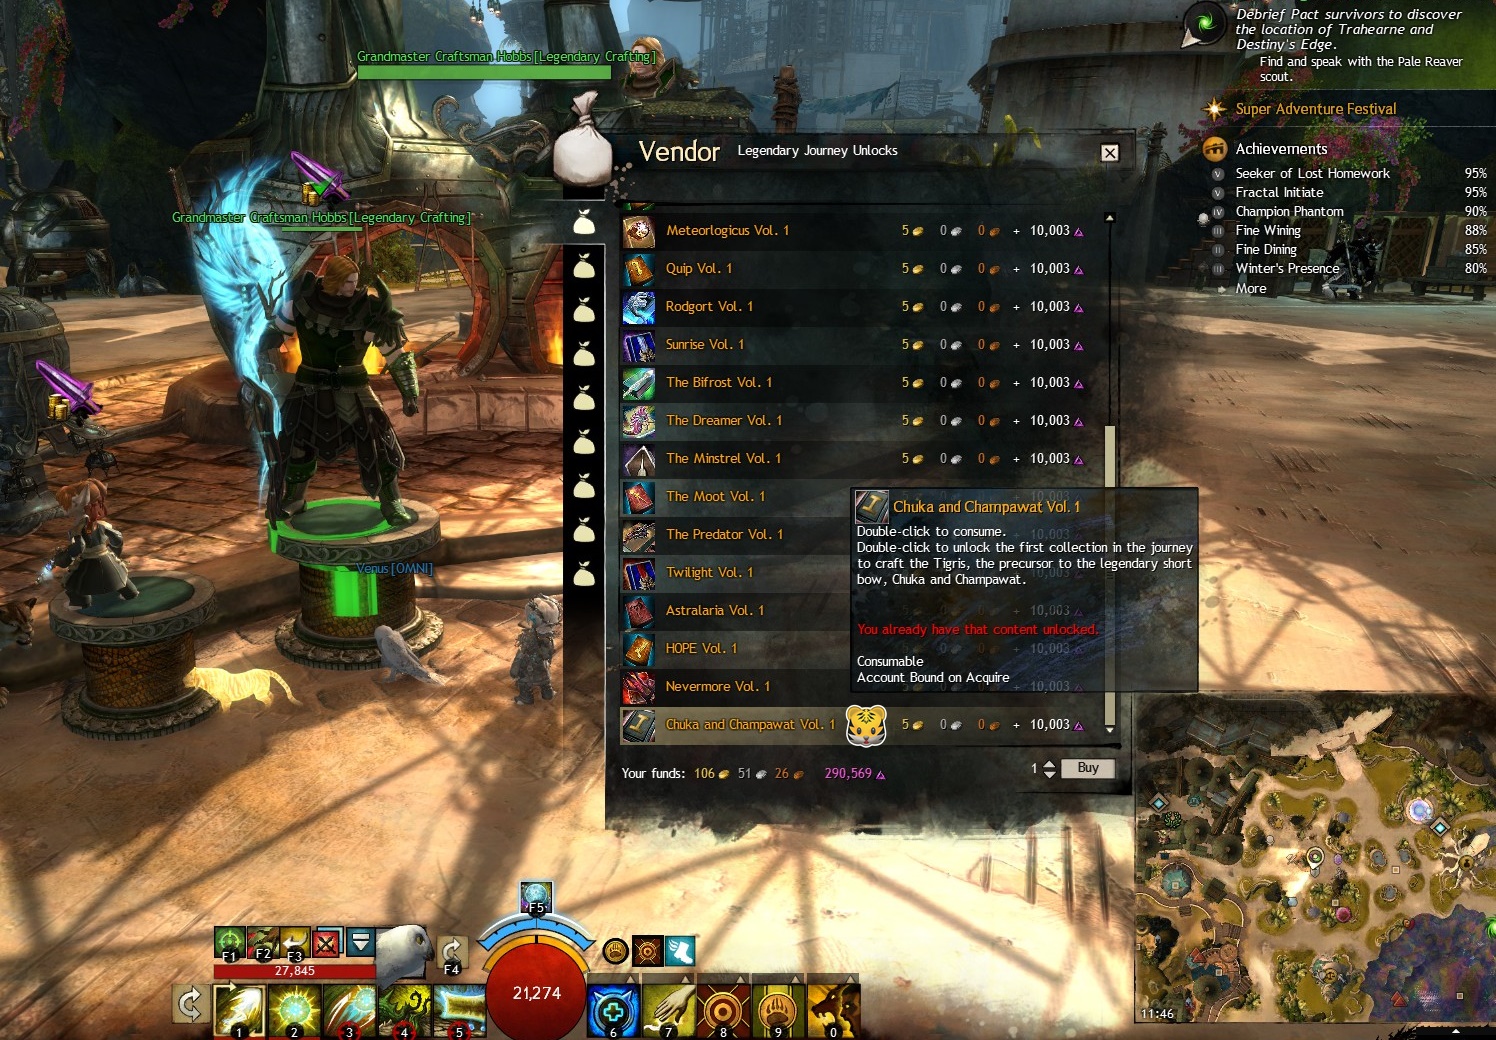
15. Chuka and Champawat Vol 2 – Bought from Grandmaster Craftsman Hobbs in Lion’s Arch for 5 Spirit Shards and 10,003 Karma. You need to have the Magister of Legends Mastery completed in order to do this (the second mastery in the Legendary Crafting Mastery tree).
16. The Hunt – Salvage this weapon (crafted from the first tier collection “Vol 1: The Hunt”) to collect the “Spirit of The Hunt” which is used to craft The Ambush.
Completing the collection awards you with 3 AP and “Tips and Tricks for Short-Bow Crafting”. This chest contains, “Expertise in Advanced Short-Bow Crafting” and “Box of Recipes: The Ambush” which will now allow you to craft the second tier of your Legendary Chuka and Champawat Short-Bow, The Ambush.
So, to craft The Ambush, you will need:
- Prismatic Lodestone
- 1 Glacial Lodestone
- 1 Molten Lodestone
- 1 Onyx Lodestone
- 1 Charged Lodestone
- Jar of Luminesce Polish
- 250 Piles of Bloodstone Dust
- 1 Amalgamated Gemstone
- 10 Thermocatalytic Reagents
- 10 Master Maintenance Oils (20 Jugs of Water and 3 Piles of Crystalline Dust per 5 Oils)
- Expertise in Advanced Short-Bow Crafting (from the “Tips and Tricks for Short-Bow Crafting” Chest for completed the Vol 2: Ambush collection)
- Spirit of The Hunt (Salvaged from The Hunt)
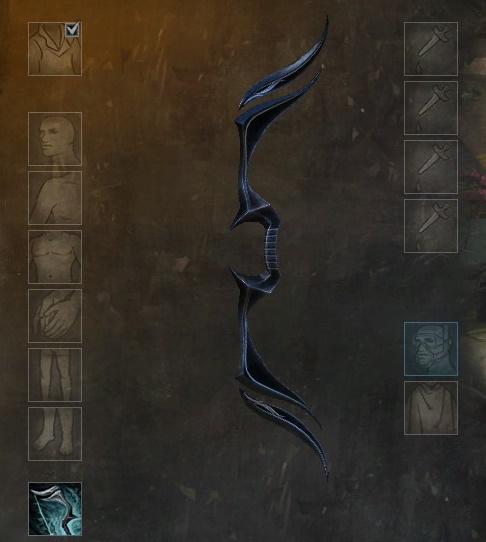
This is what The Ambush looks like. It’s very similar to The Hunt but less wonky and a bit more symmetrical. This is what all that effort and materials were for… totally worth it so far… not. Will be for the end result though (and the Tiger Cubs)!
GW2: Chuka and Champawat Vol 1: Hunter’s Journal
The Hunter’s Journal is part of the Chuka and Champawat Volume 1: The Hunt collection. After you have spoken to Bagred the Hunter in Snowden Drifts, received the recipe for the Crude Leather Book and crafted it, a new sub-collection will unlock:
Chuka and Champawat I Hunter’s Journal: “Under Bagred’s tutelage, I now undertake my hunt. The pages will chronicle the pages of my deed”.
This is what the collection looks like in the achievements tab:
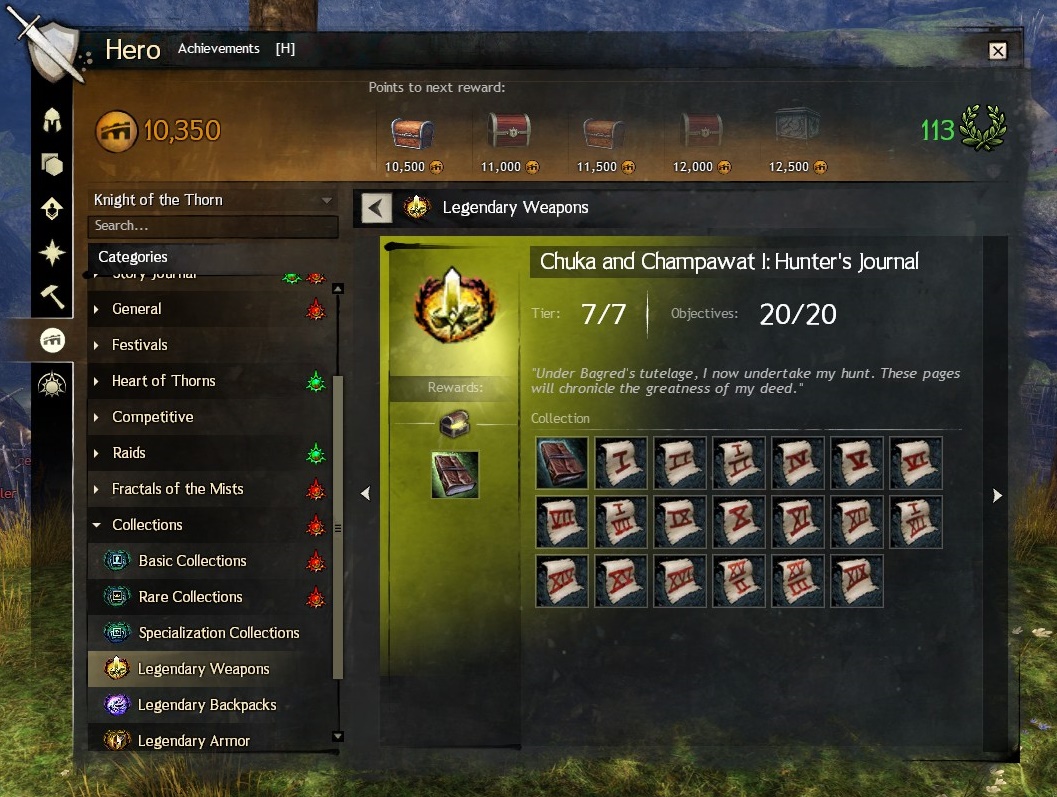
There are 20 parts to this collection, the first being the Crude Leather Book that unlocked the collection and the other 19 have to be completed in order. As I completed this collection just over a year ago I cannot replay the steps to give you accurate screenshots. I briefly looked at a few guides (mainly referring to Dulfy) to refresh my memory and make this as helpful as possible.
I remember it taking me about 2 hours to complete without using any guides and following all the trails rather than skipping ahead. This is going to be a long guide, but this was probably my favourite part of the Chuka and Champawat collection.
It would be useful to do this collection with a character that has 100% map completion as there is quite a lot of moving about and traveling to different places, so it would save a lot of time along the way.
Entry 1: “I’m looking for a challenging hunt, and rumour has it there’s a tiger harassing researchers in Metrica Province. I’ll contact researcher Hrappa at the Rana Landing Complex. Could this prey be worthy of my skills?”
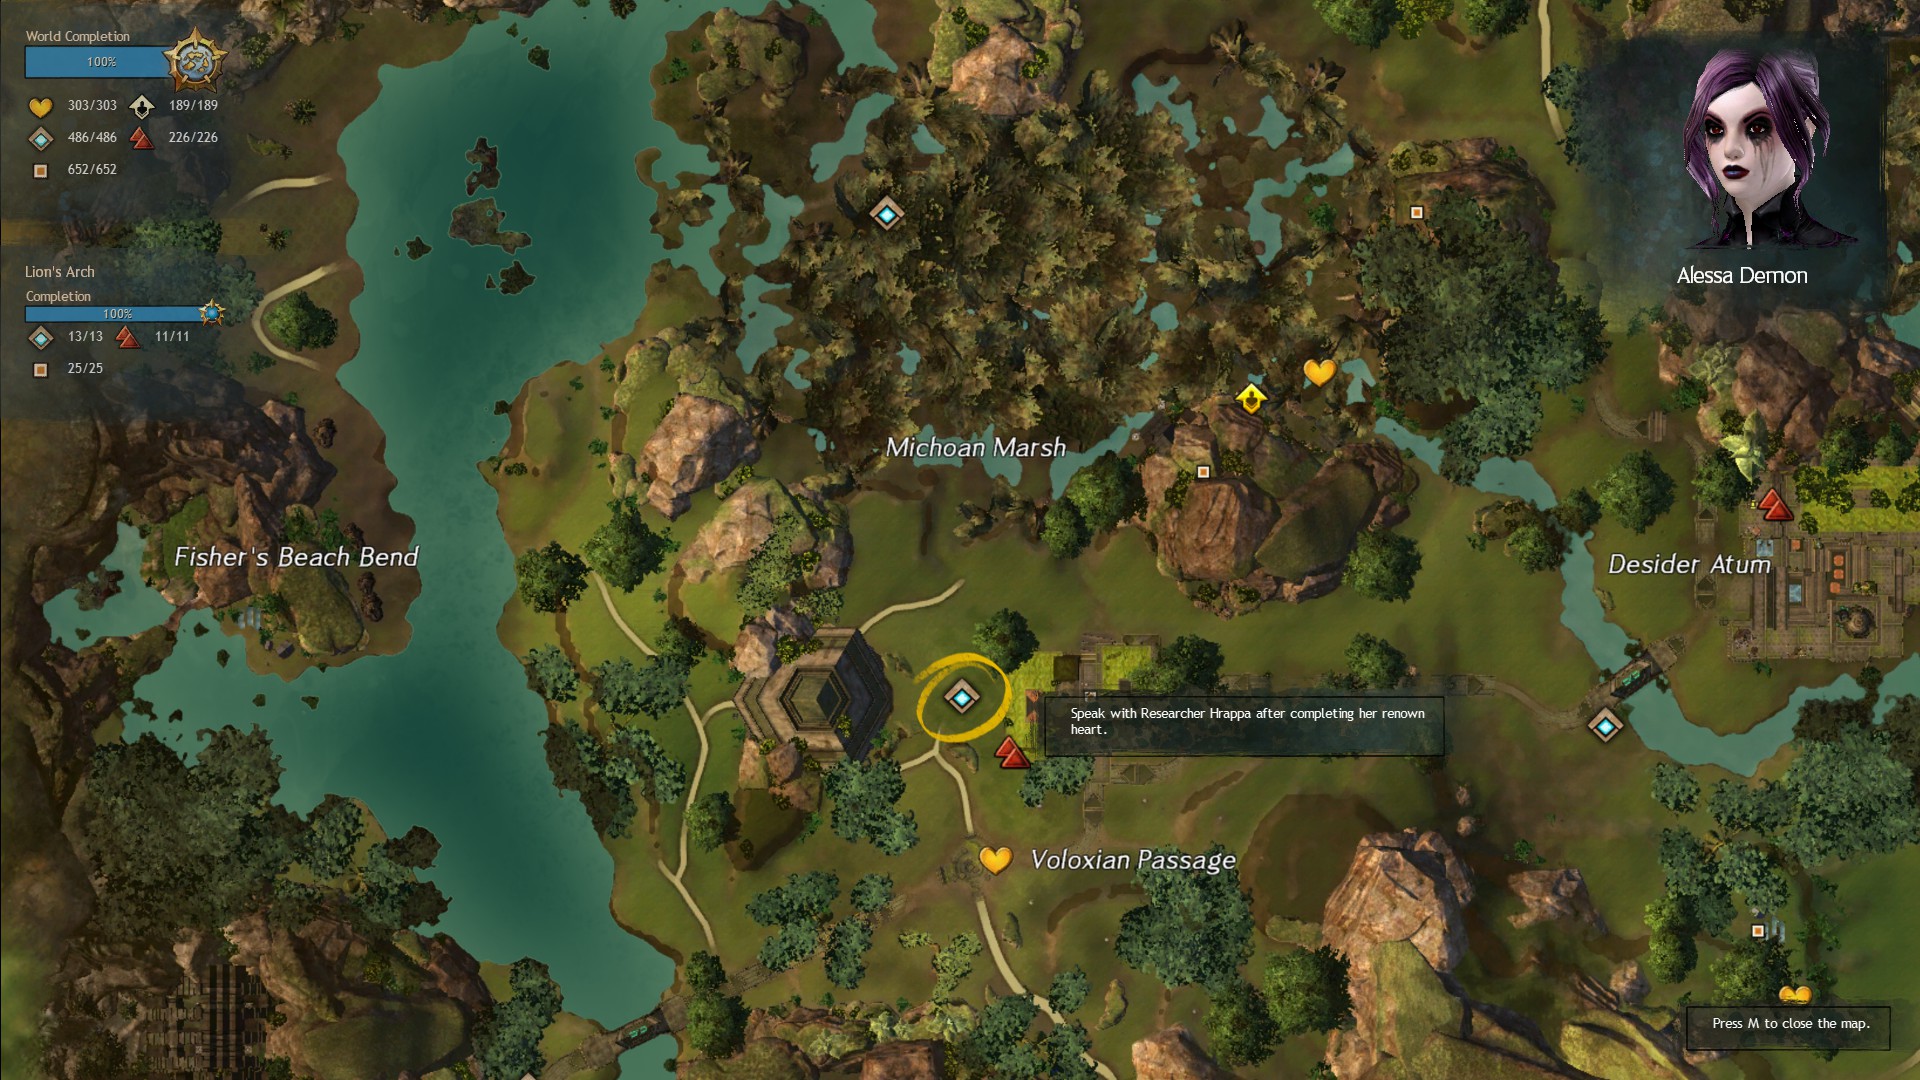
You will need to complete the renown heart at Voloxoan Passage in order to speak to Hrappa about the tigers. You will then need to interact with some of the Alliance Monitors to look for camera footage of the tigers. The entry will be completed when you find the correct monitor.
Entry 2: “I’m told there may be two tigers! They’ve been tearing into supplies and terrifying research subjects. The evidence points east, I’ll follow the tracks and see what turns up.”
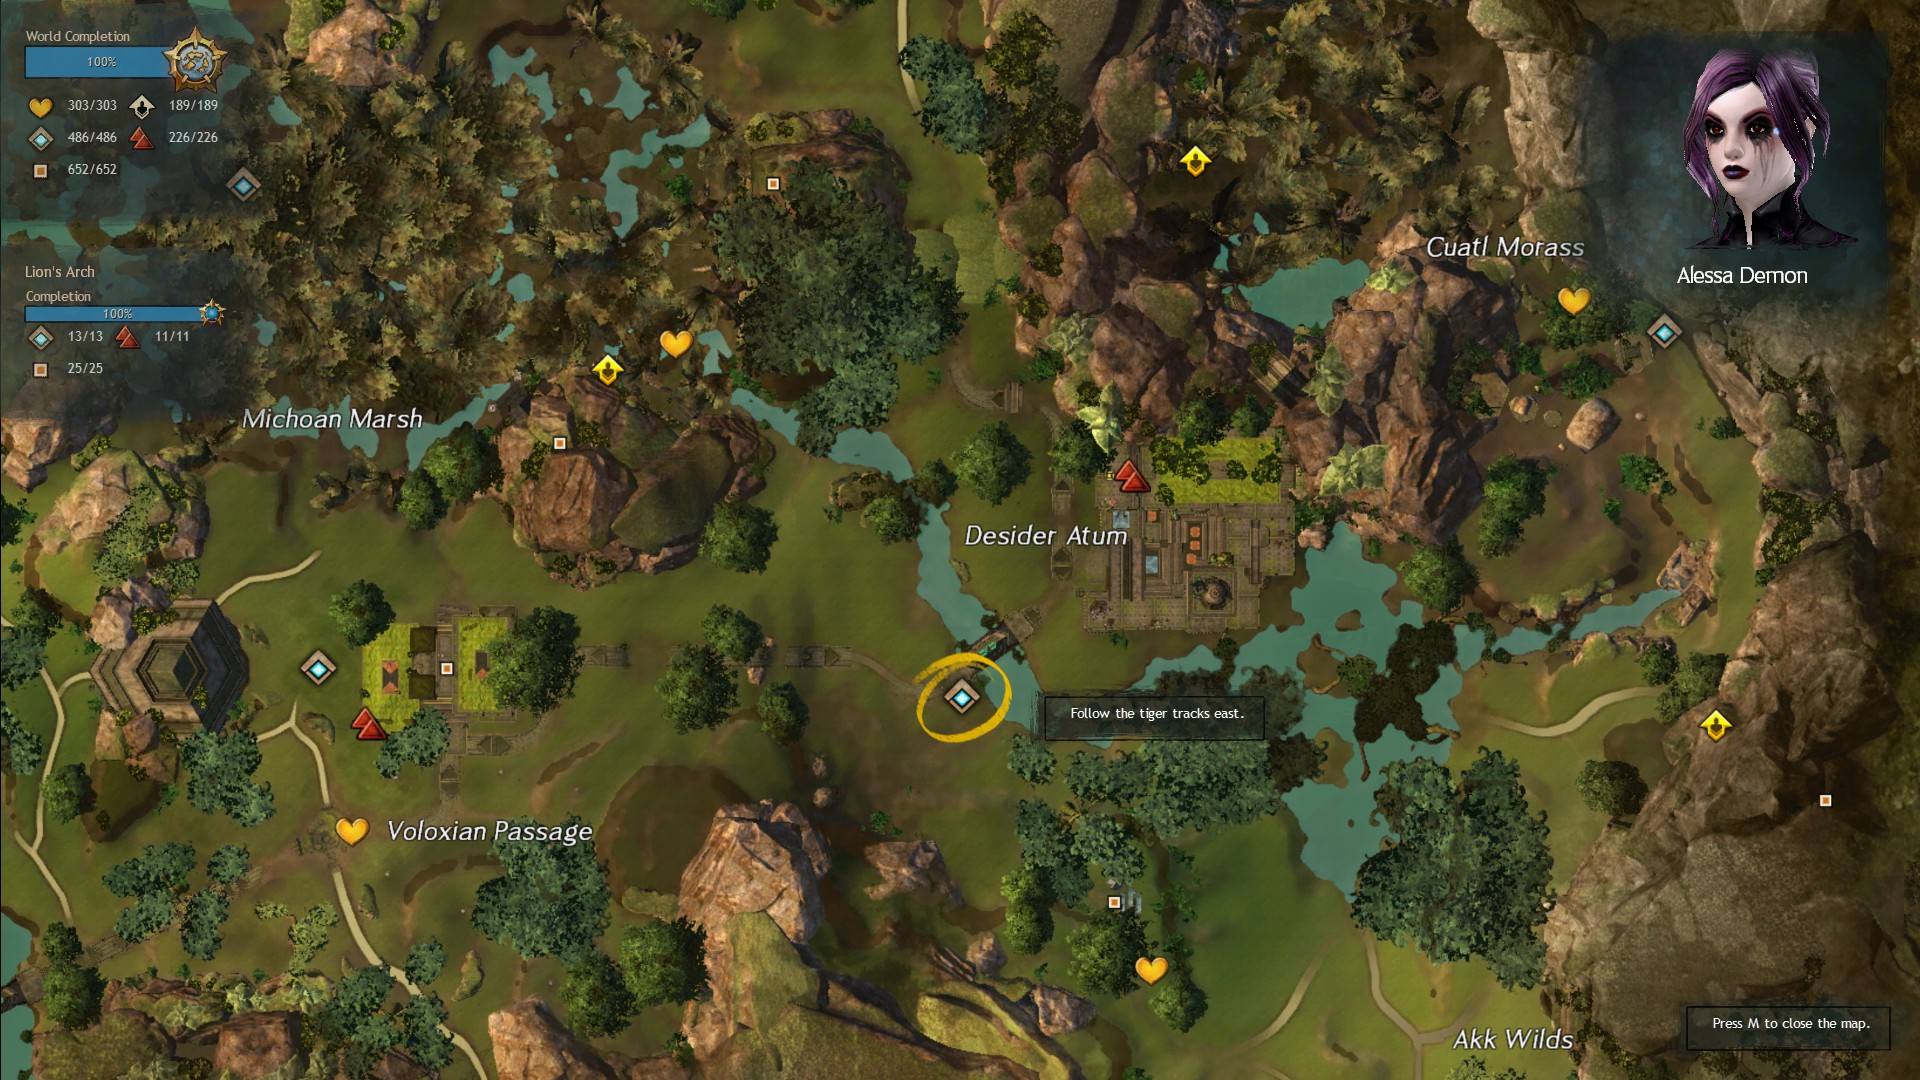
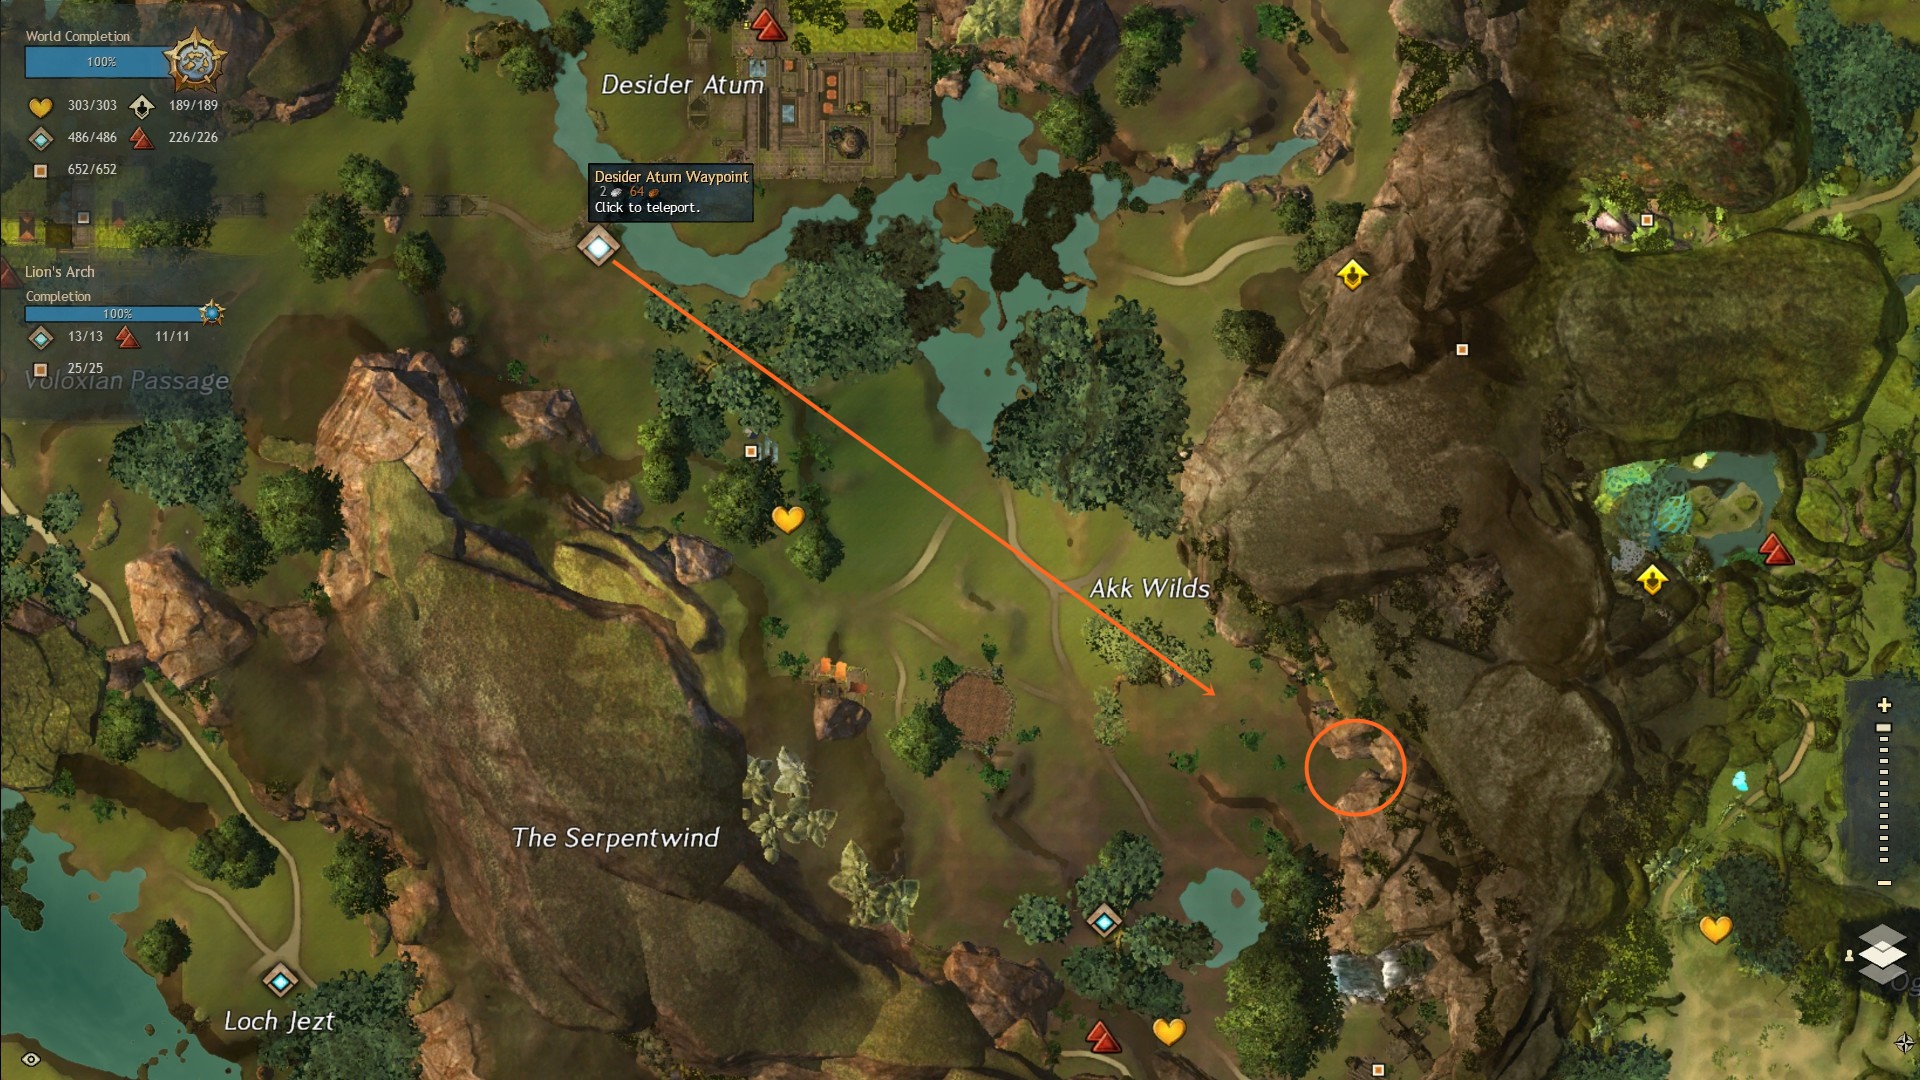
Travel south-east from Desider Atum waypoint. Roughly where the arrow ends (screenshot below) you will find Signs of Tiger Habitation and tiger tracks at the circle. Interacting with the tracks will complete entry 2.
Entry 3: “The hunt is on! I discovered signs of a den and – more importantly – I’ve picked up their trail. The trail leads into southern Caledon. Maybe the local Hylek villagers know something.”
Again you will need to complete the renown heart to the west to be able to speak to Atzintli and complete the entry. He will lead you to the cliffs.

Entry 4: “What luck! There are recent reports of a tiger sighting near the cliffs to the south!”
Go to the pace by the cliffs marked on the map and interact with the Signs of Tiger Habitation. This will spawn Legendary Chuka and Legendary Champawat and you will have to fight… at about 2/3 health they will run off before you can kill them. Chase them to complete the entry.

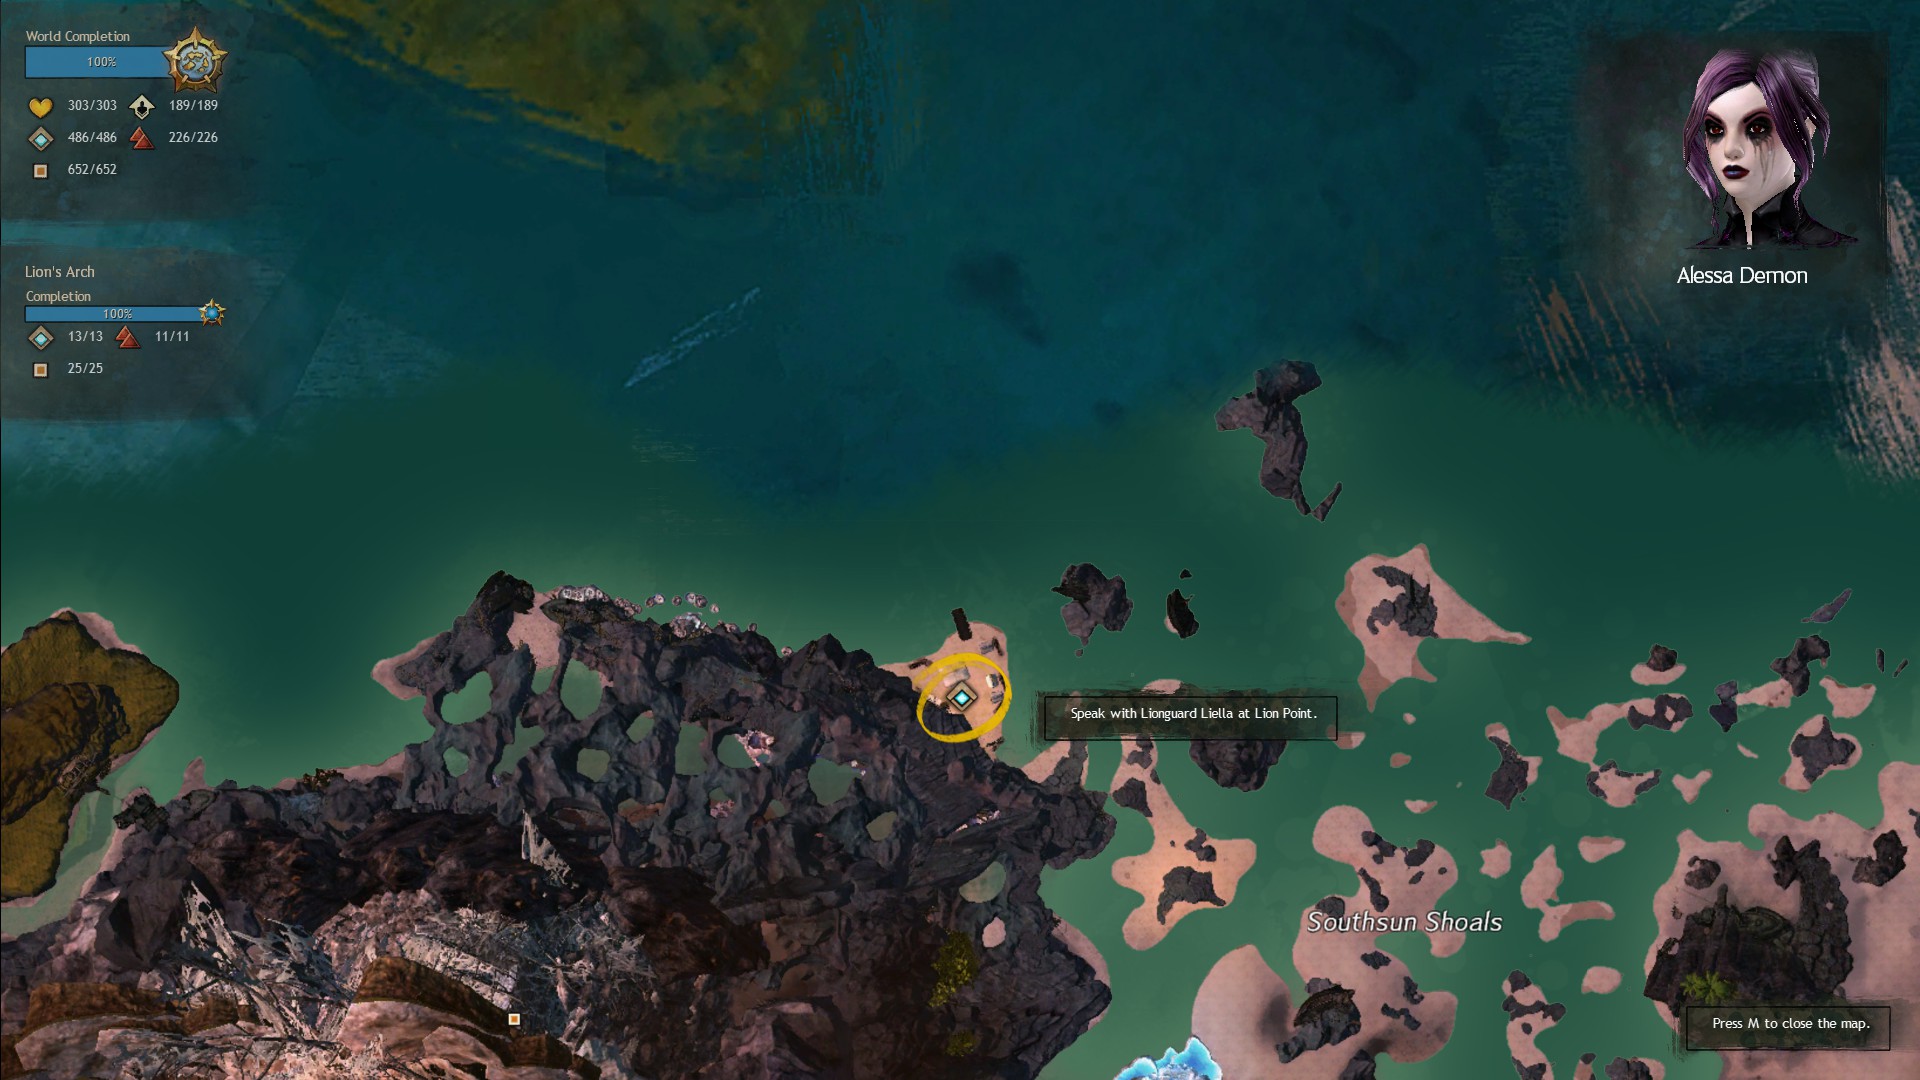
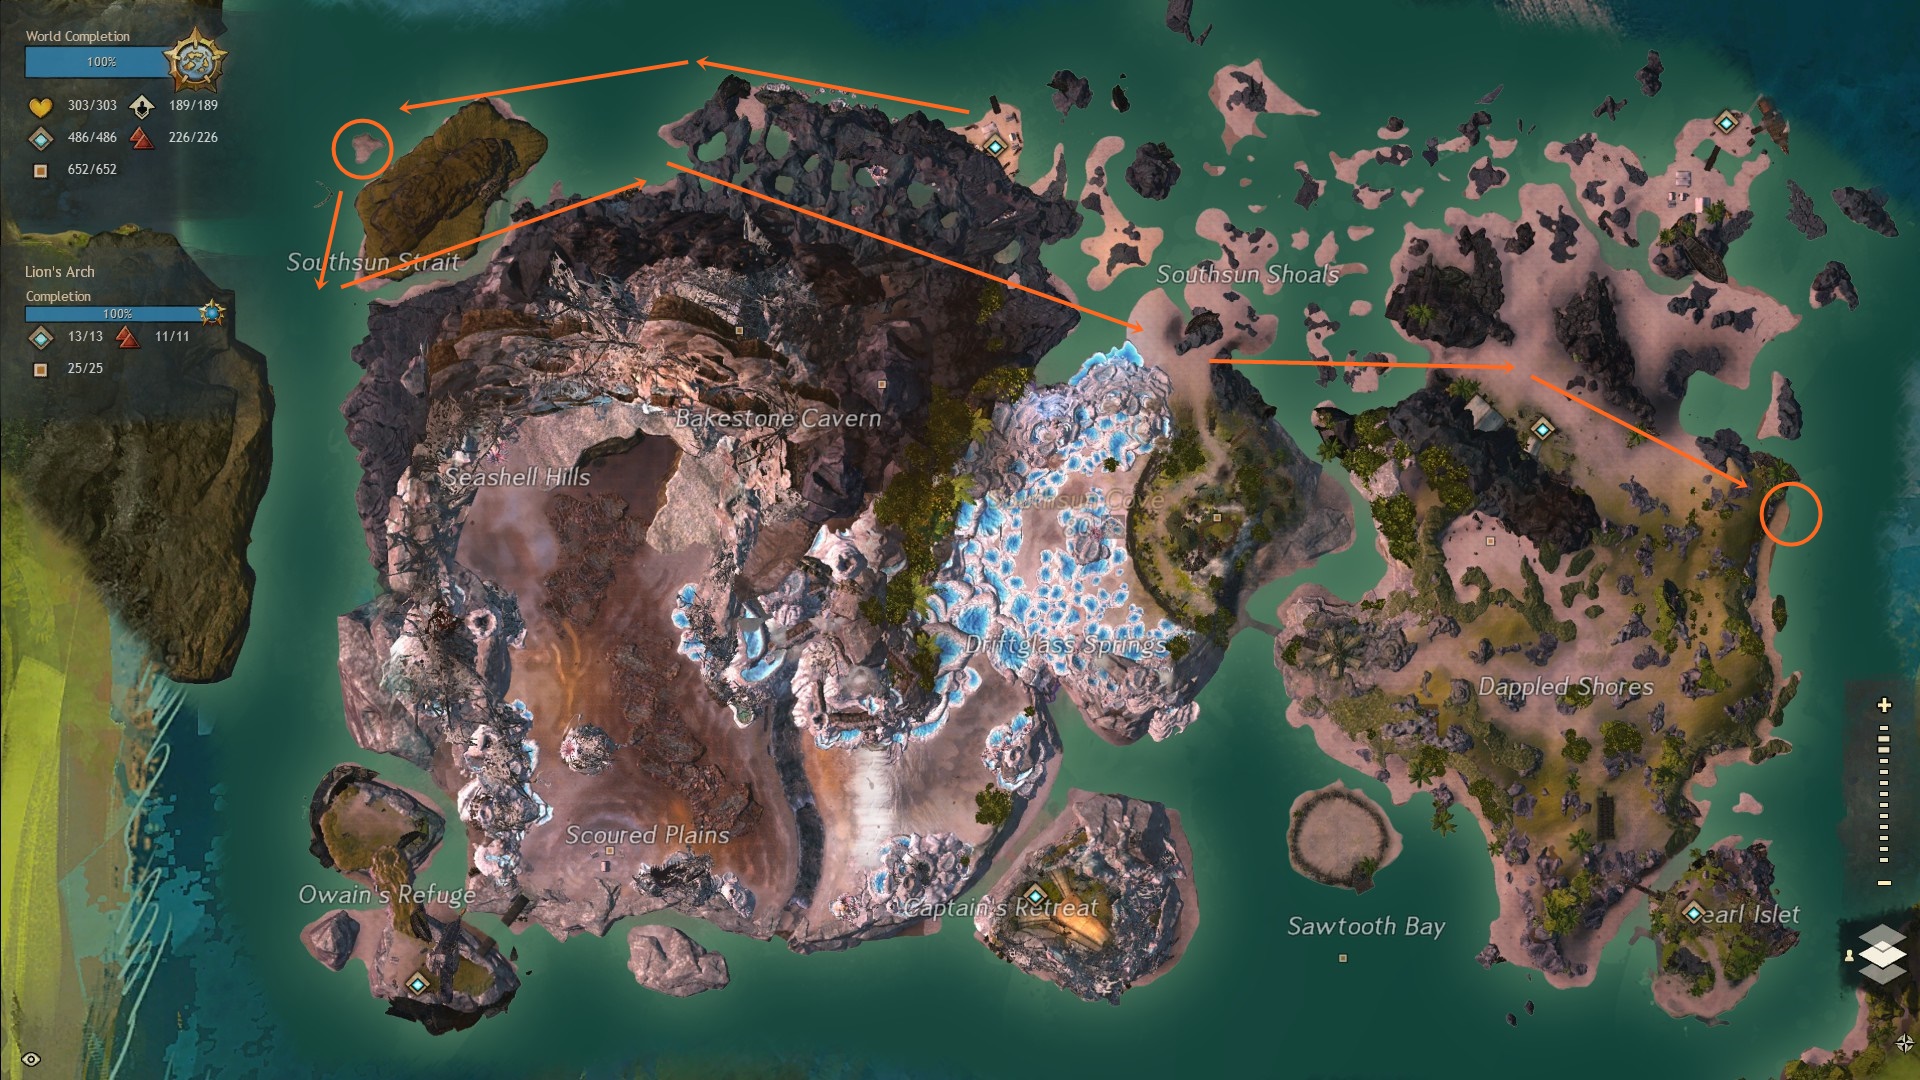
Entry 5: “I tracked them down! They fight with such ferocity! I wasn’t able to bring them down before they escaped, but the trail is fresh. To Southsun Strait! I’ll cut them off at Southsun Cove. If my luck holds, someone at Lion Point will have spotted them.”
Talk to Lionguard Liella located in the camp where Lion Point waypoint is to complete entry 5.
Entry 6: “Circumstances have changed. It seems the beasts are now attacking people. Did our confrontation drive them to this? Settlers have been killed and dragged off to the west. The stakes are rising rapidly – this hunt is no longer merely for sport. Lives are in danger. They’ve fled west. The wet sands should preserve their tracks.”
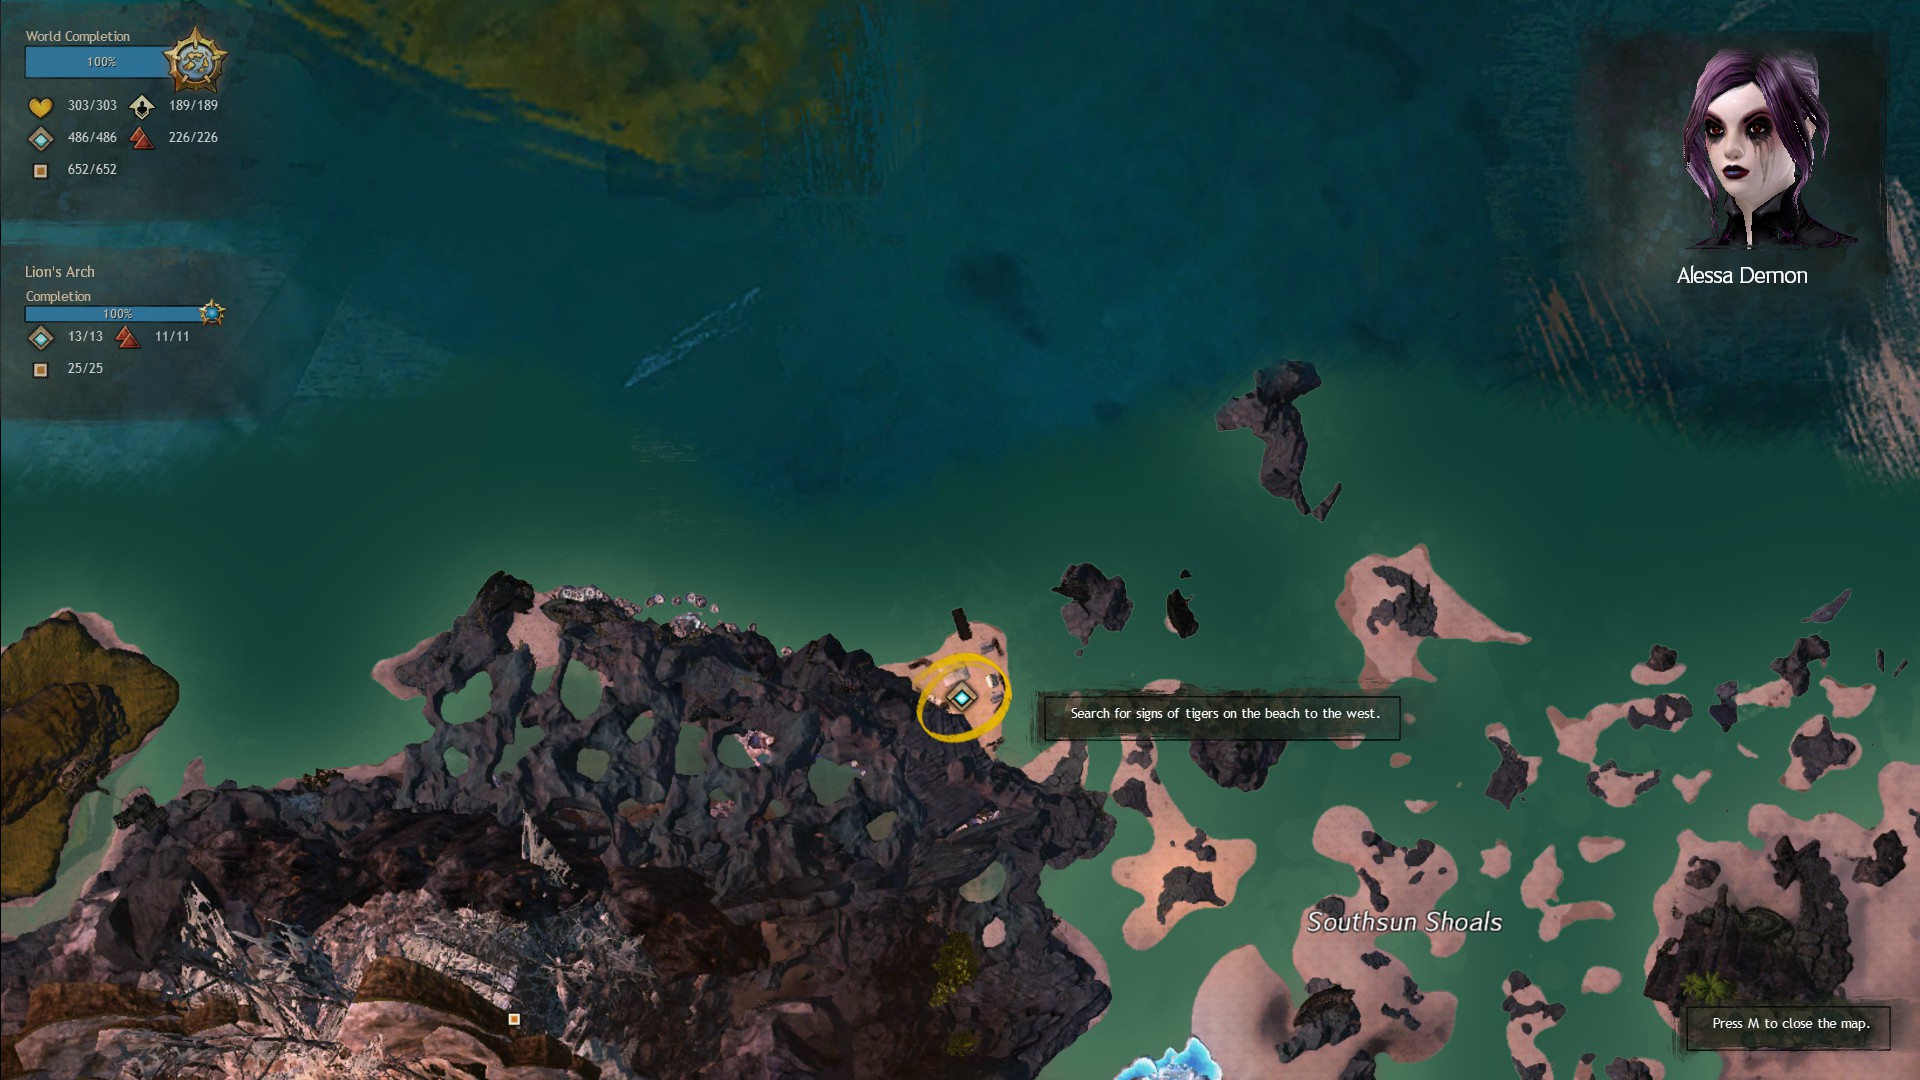
Follow the tiger tracks west. This will lead you to a Tiger Attack Victim north of Southsun Strait (northwest corner). The tracks will then lead you east to the very edge of the map and lead you to Sparkfly Fen, roughly following the path of orange arrows on the map below.
Entry 7: “Tracking them is difficult in this terrain, but I think I’ve gained ground. Signs point east into Sparkfly Fen. I should search for the man-eaters’ whereabouts around Verarium Delves.”
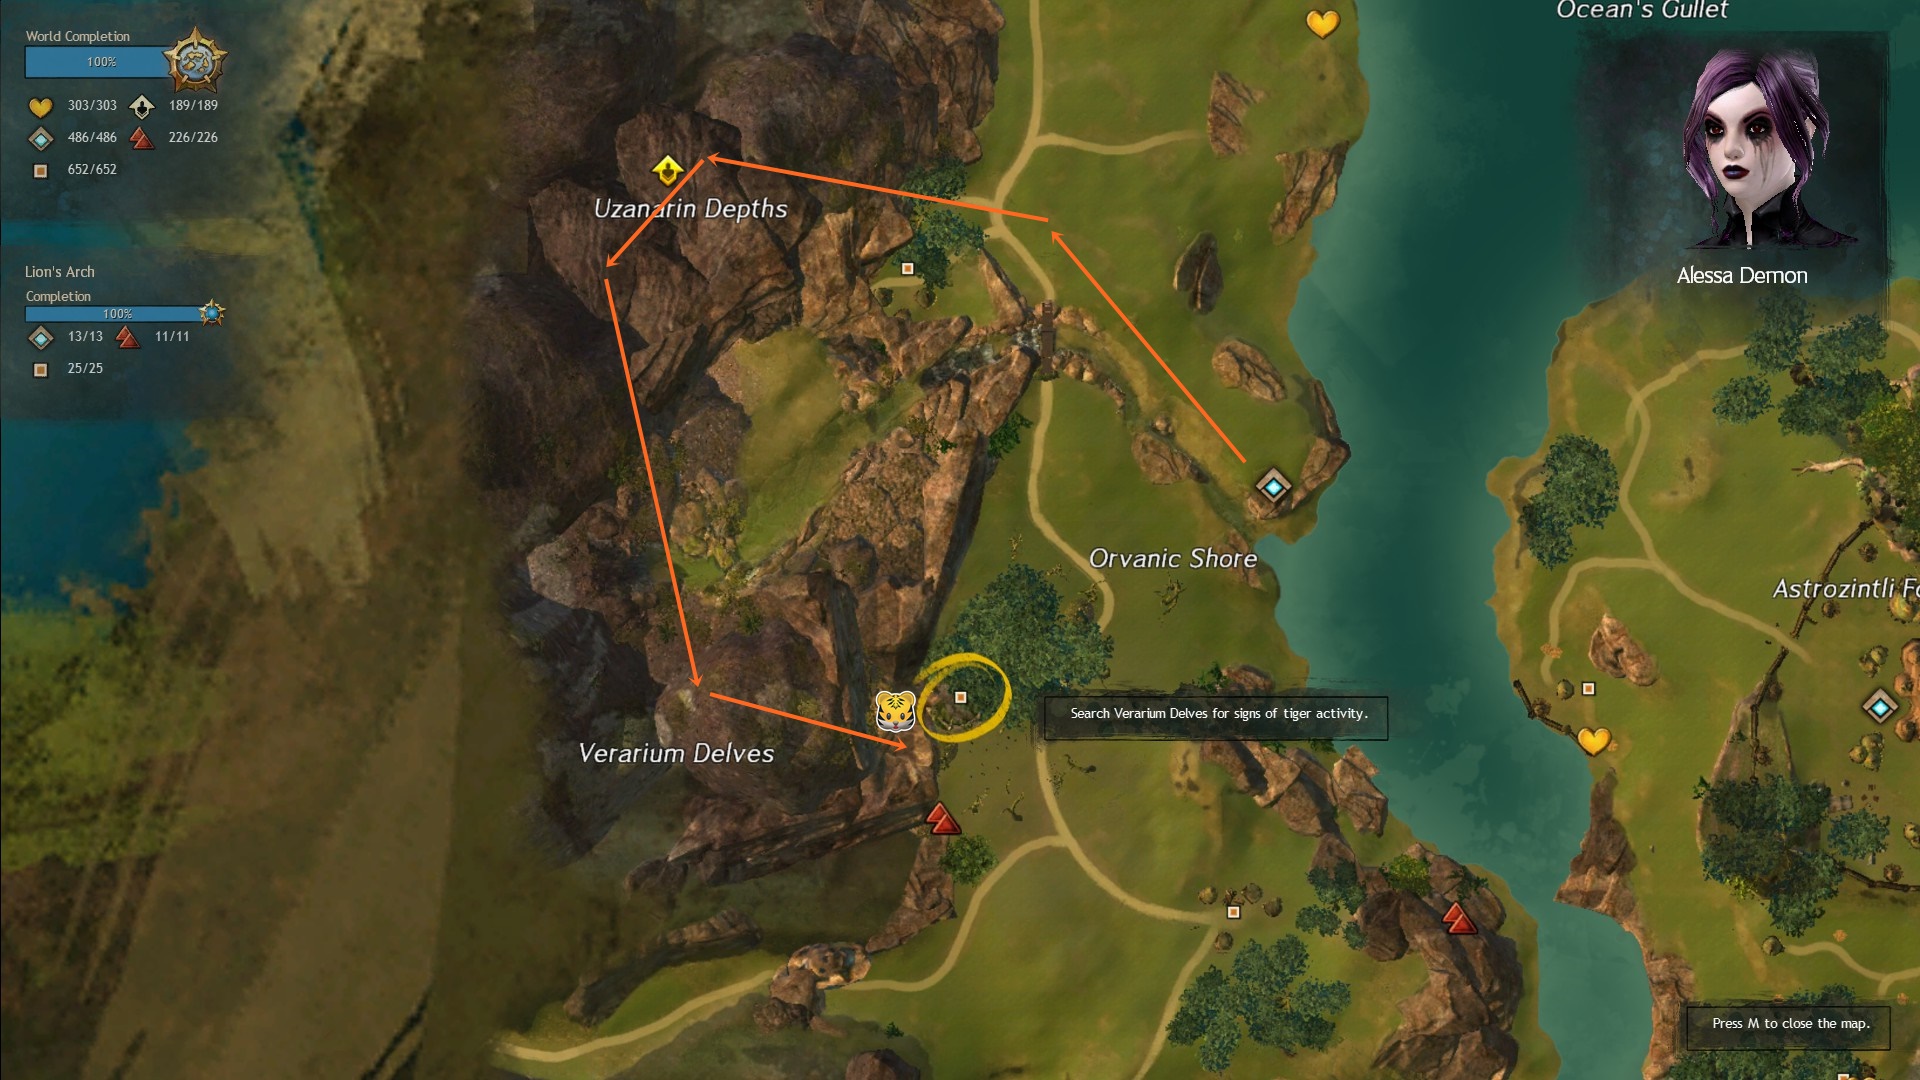
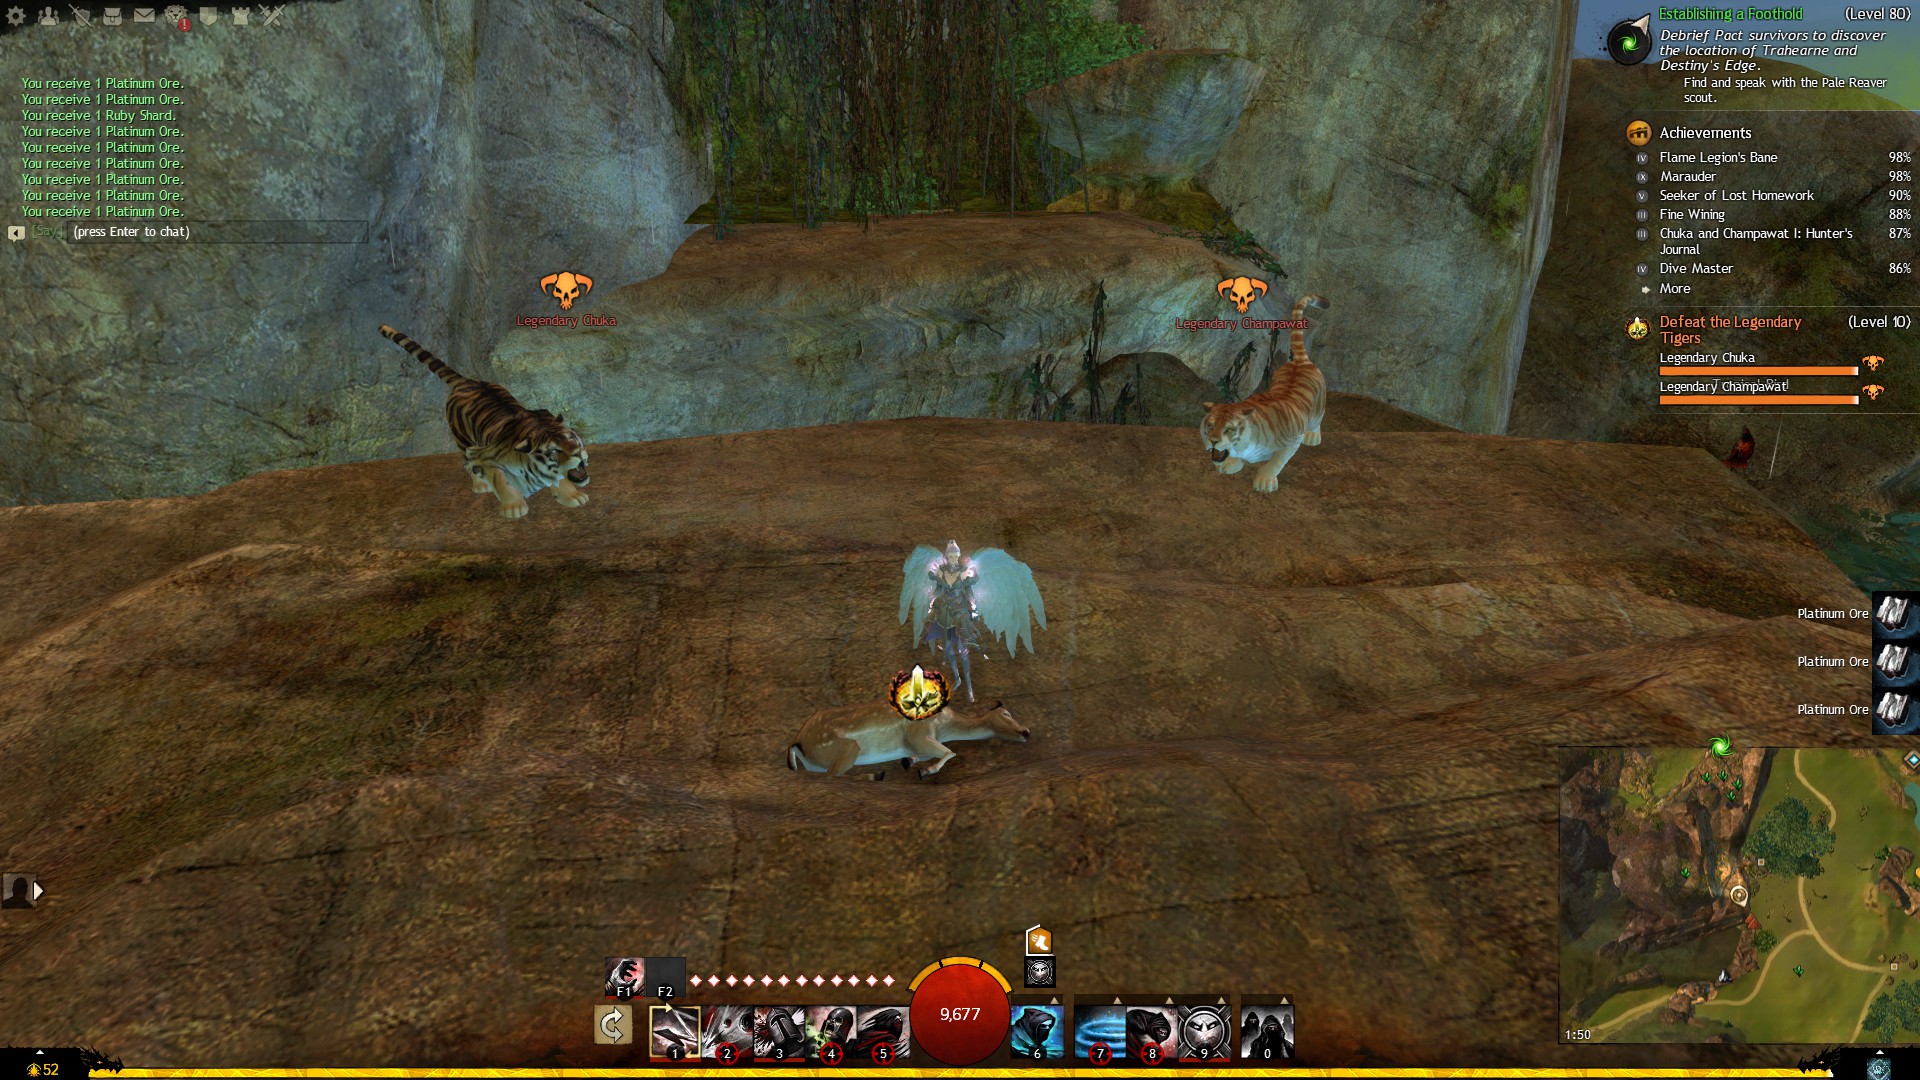
Follow the rough direction of the arrows through the caves, past the hero point and then onto a ledge where you will find another Sign of Tiger Habitation. Interacting with this will spawn both Legendary Tigers (as you can see from the screen shot below – it’s the only screenshot I took when I was actually doing this collection myself!) which you will have to fight, and they are quite tough this time. Again they will run off (at about half health) before you can defeat them.
The tiger face symbolises a tiger den which you need to find for the Spirit of the Tiger Achievement. Although the tiger dens have nothing to do with the Chuka and Champawat collection, it is a good time to start this achievement alongside the Hunter’s Journal as you will have to go to places where some are the dens are. Likewise for future parts in the Chuka and Champawat collections. After the tigers run off, walk north to the edge of the ledge you fought the tigers on, drop off the ledge onto a lower ledge and you will find the tiger den hidden in a corner within the cliff.
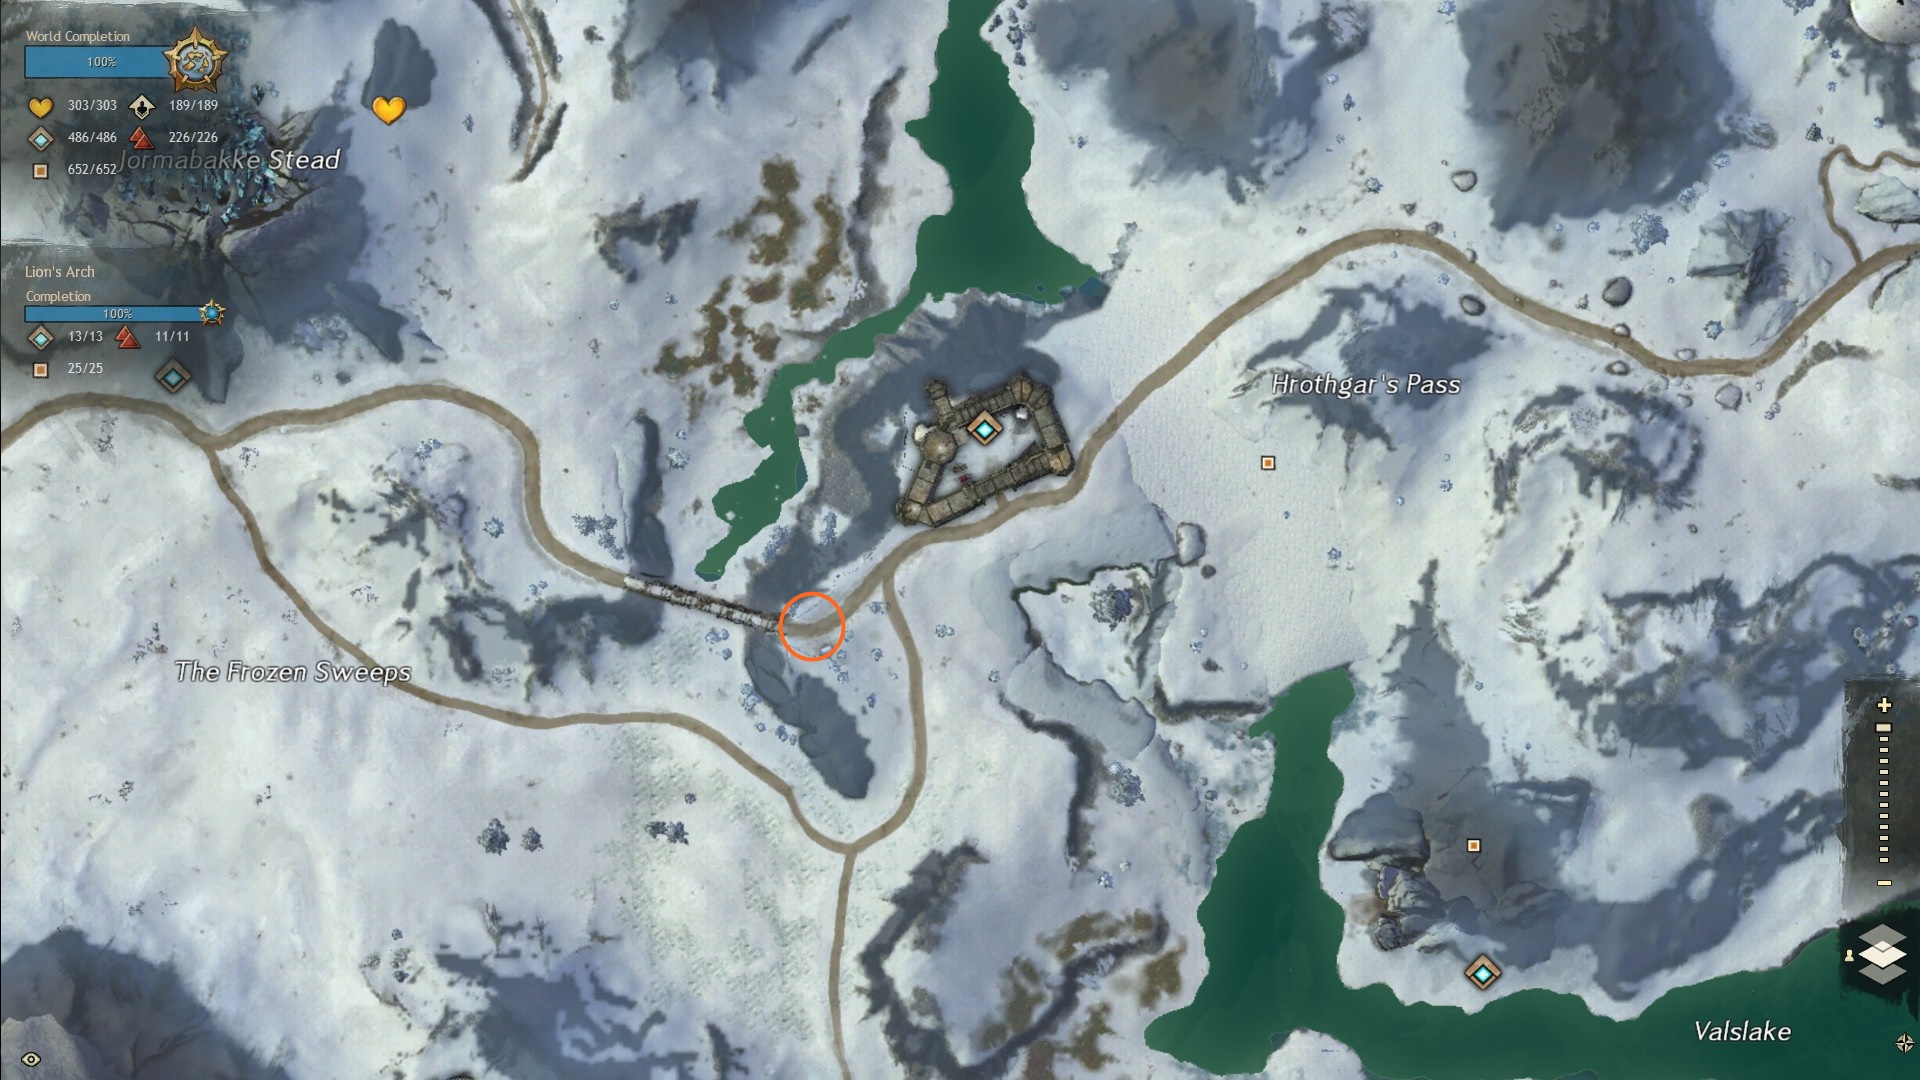
Entry 8: “The vicious animals had slunk off into the cliffs near the Tower of Modius! They escaped me but not without a fight. I must stop them. I tracked the vicious animals down and gravely wounded the male. Following its trail should be simple enough.
Follow the trail of tiger blood through Sparkfly Fen into Bloodtide Coast then through the Lornar’s Pass. Interact with the Tiger Tracks on the orange circle to complete the entry.
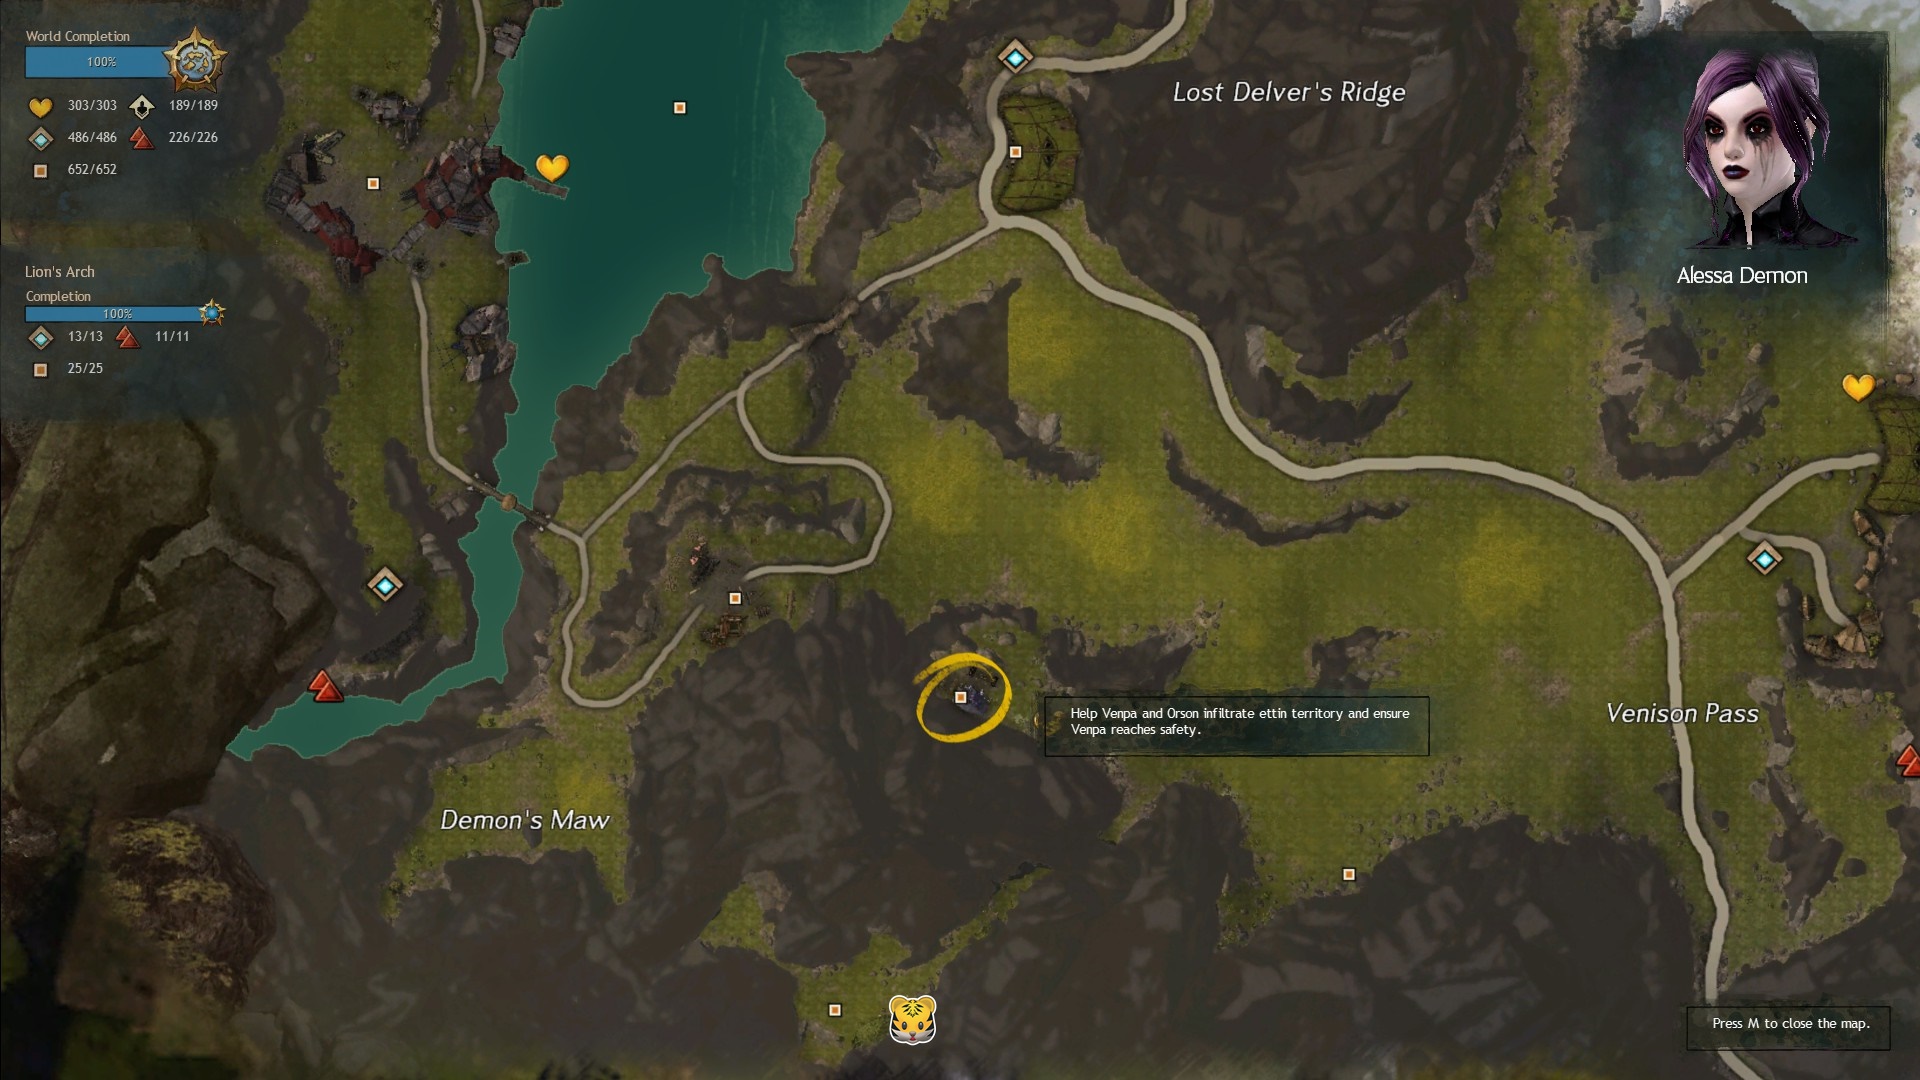
Entry 9: “The Brutes have led me to Lornar’s Pass and are heading for Ettin Territory. I must be careful. The nearby Ettinworks Lab is investigating ways to avoid Ettin detection. Aiding them should give me ample opportunities to search the area.”
To complete this entry you need to complete the event chain at the marked location. The specific event in the chain that completes the entry is “Free Venpa and help her reach safety” so if this event isn’t active when you get there just continue with the event chain or wait for the chain to start.
Again there is another tiger den here for the Spirit of the Tiger achievement. It is on a ledge marked with the tiger face and you will just need to jump up some rocks to get to it.
Entry 10: “The local Ettin Chief seems to be fascinated with pets. It appears at least one of the tigers was held here in captivity for a time. I’m too late. They’ve moved on. Signs point east into the Shiverpeak Mountains. I should search the Tribulation Caverns for clues.”
Travel to Sorrow’s Embrace waypoint in Dredgehaunt Cliffs. You will need to completed 2 jumping puzzles in order to reach the next locations. The first you need to do is Tribulation Rift Scaffolding which then leads you onto Tribulations Caverns. The orange arrows roughly point out the direction of the jumping puzzles but looks up video guides if you’re not familiar with them.
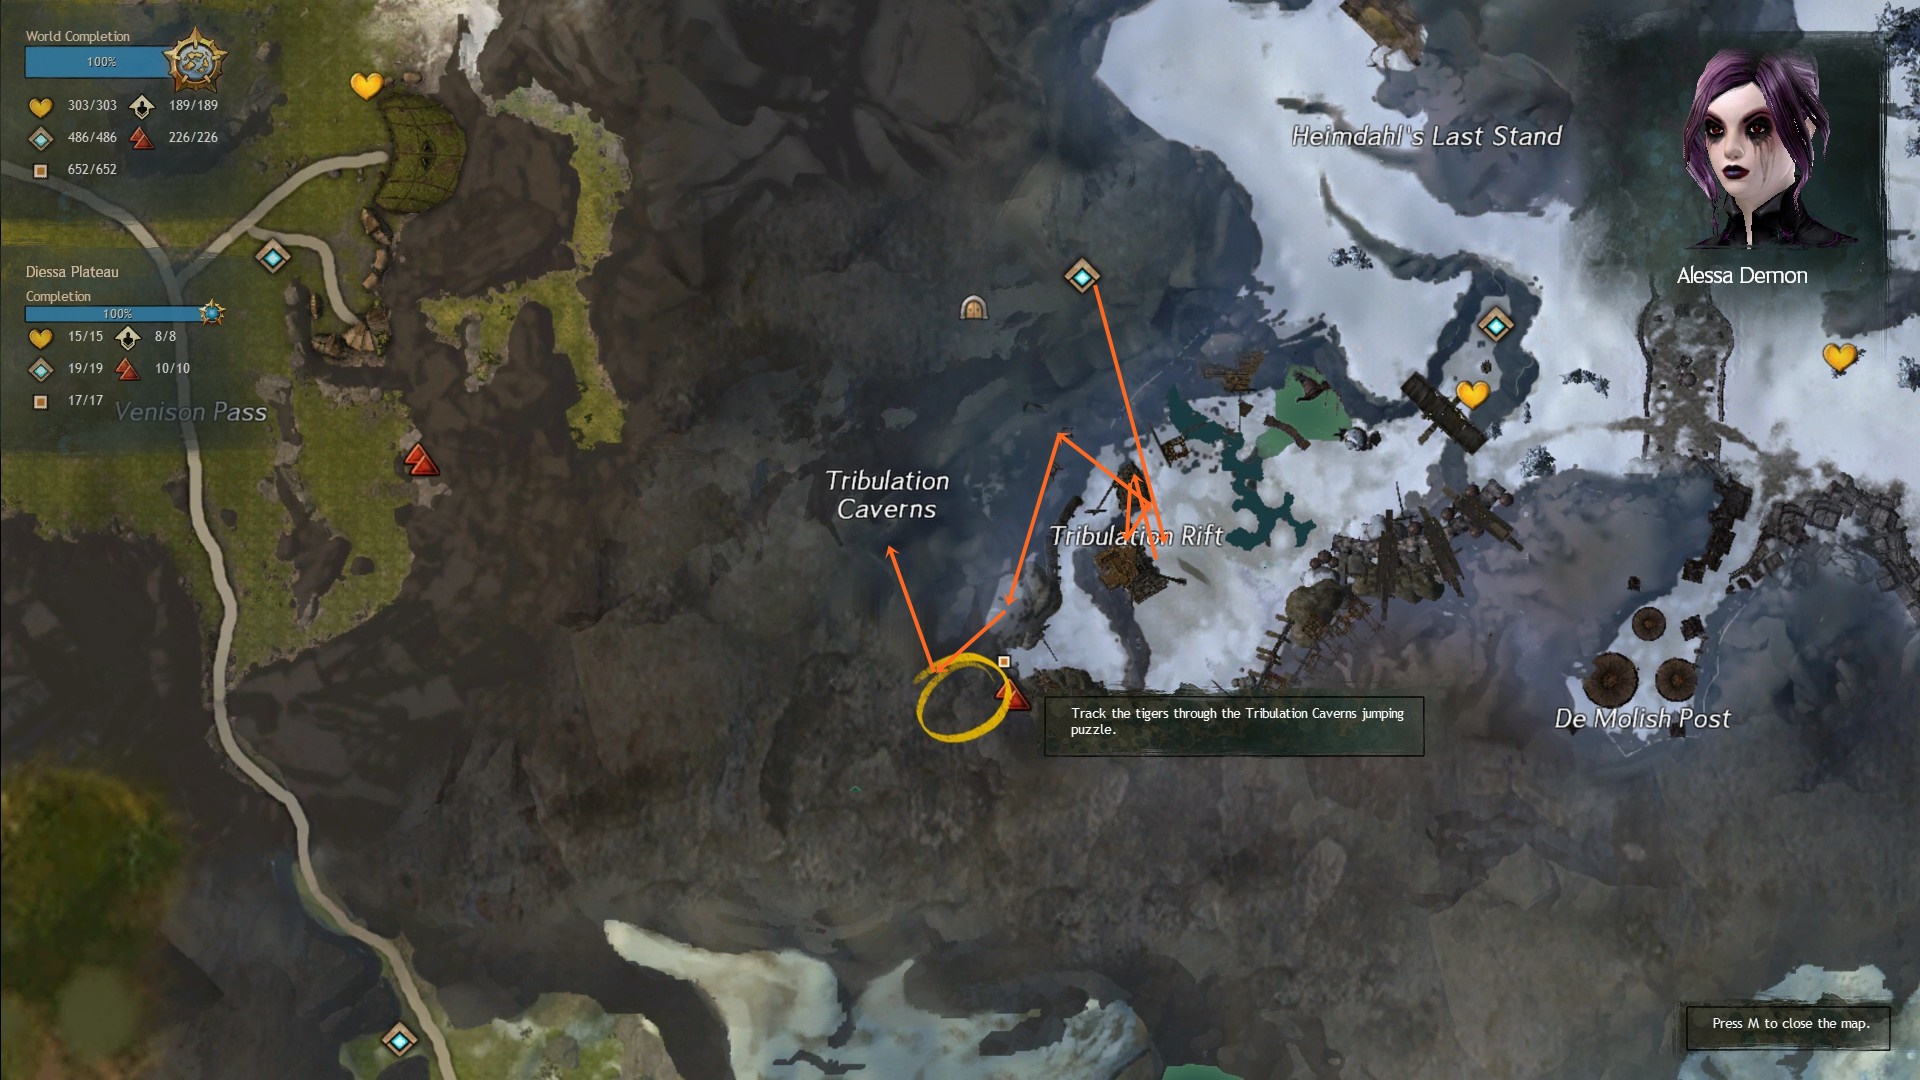
When you have completed the Tribulations Caverns jumping puzzle, interact with the Tiger Signs to spawn the Legendary Tigers again. Be careful this time because if you die you will need to do the jump puzzles over again, bring a friend if you need to. Chuka will spawn on 50% health, so focus him as Champawat only runs off again later. You will actually need to kill Chuka this time and the entry will complete on his death.
Entry 11: I’ve slain one if the evil man-eaters! The cold and snow give me and advantage. The other creature fled, but this hunt will end soon.”
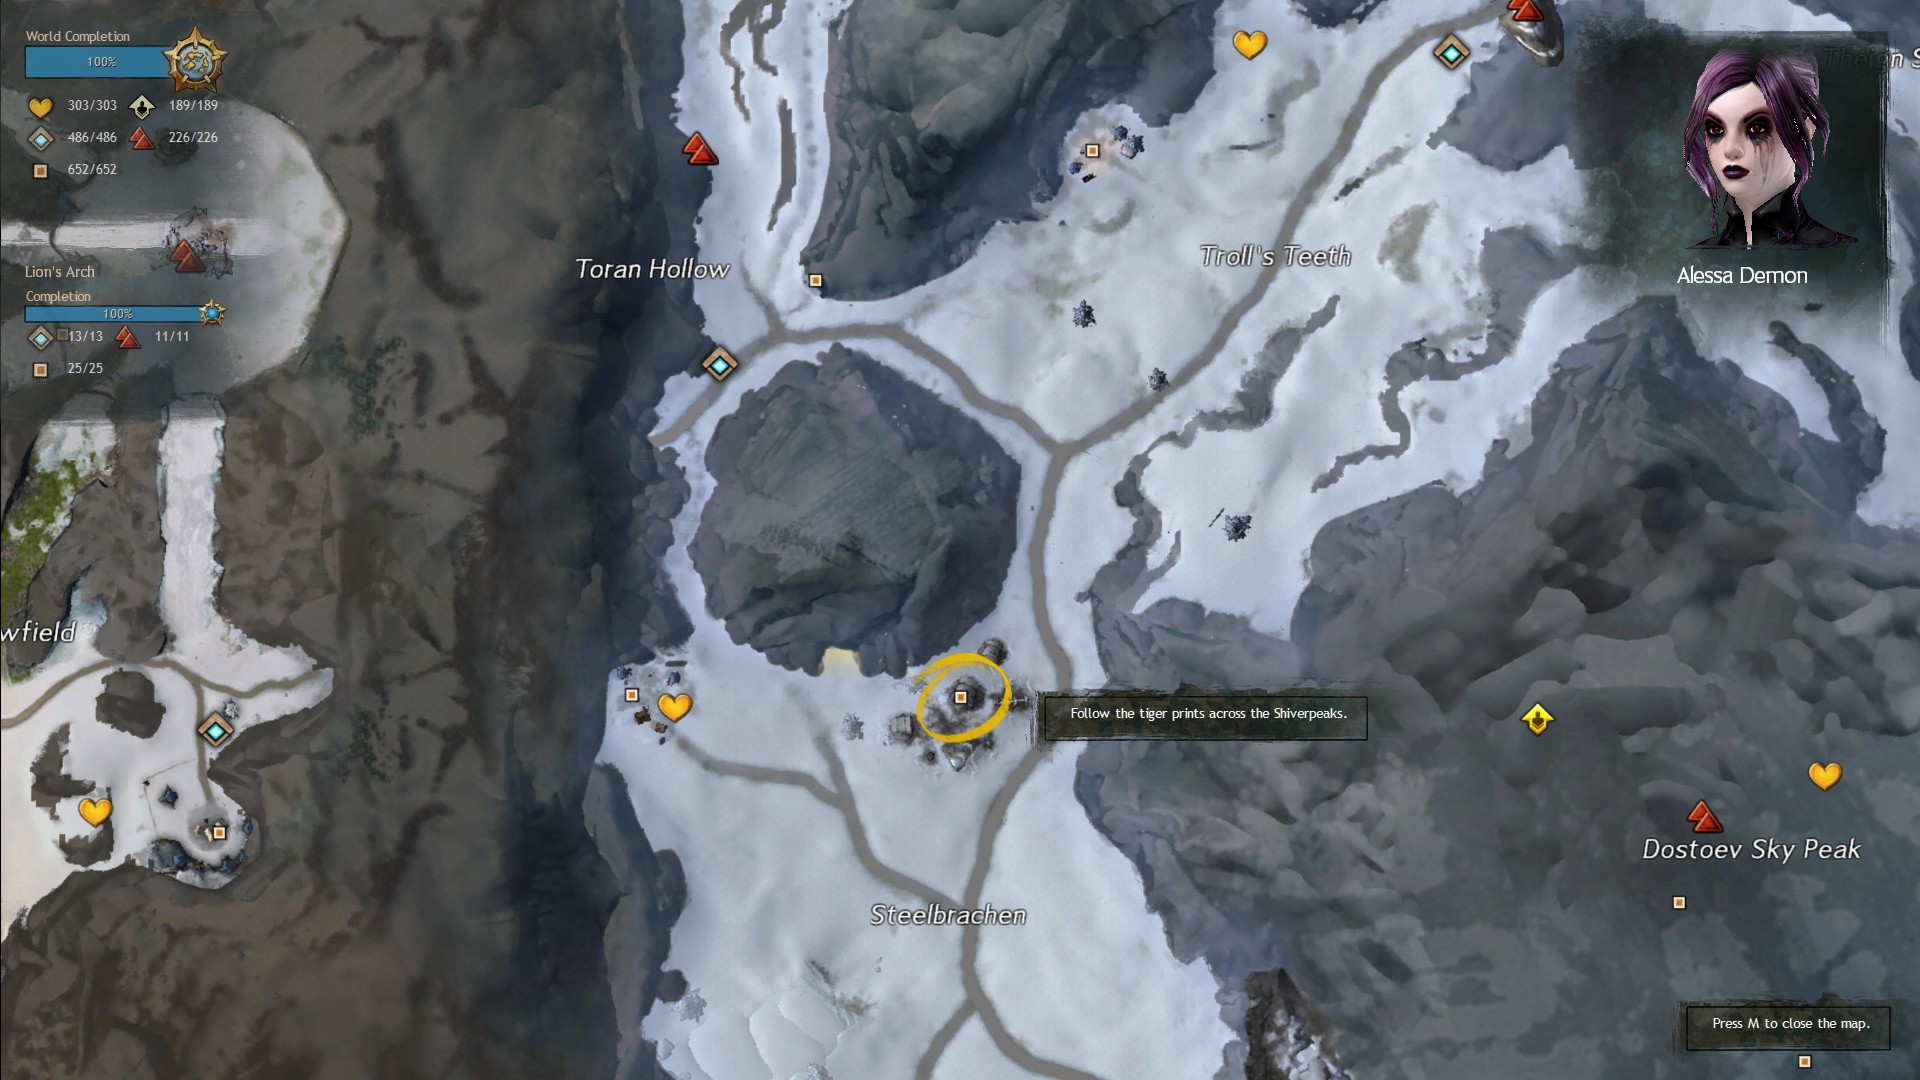
This entry involves following more tiger tracks from Dredgehaunt Cliffs, through Hoelbrak and into Wayfarer Foothills. You need to interact with the Tiger Tracks leading to Diessa Plateau to complete this entry.
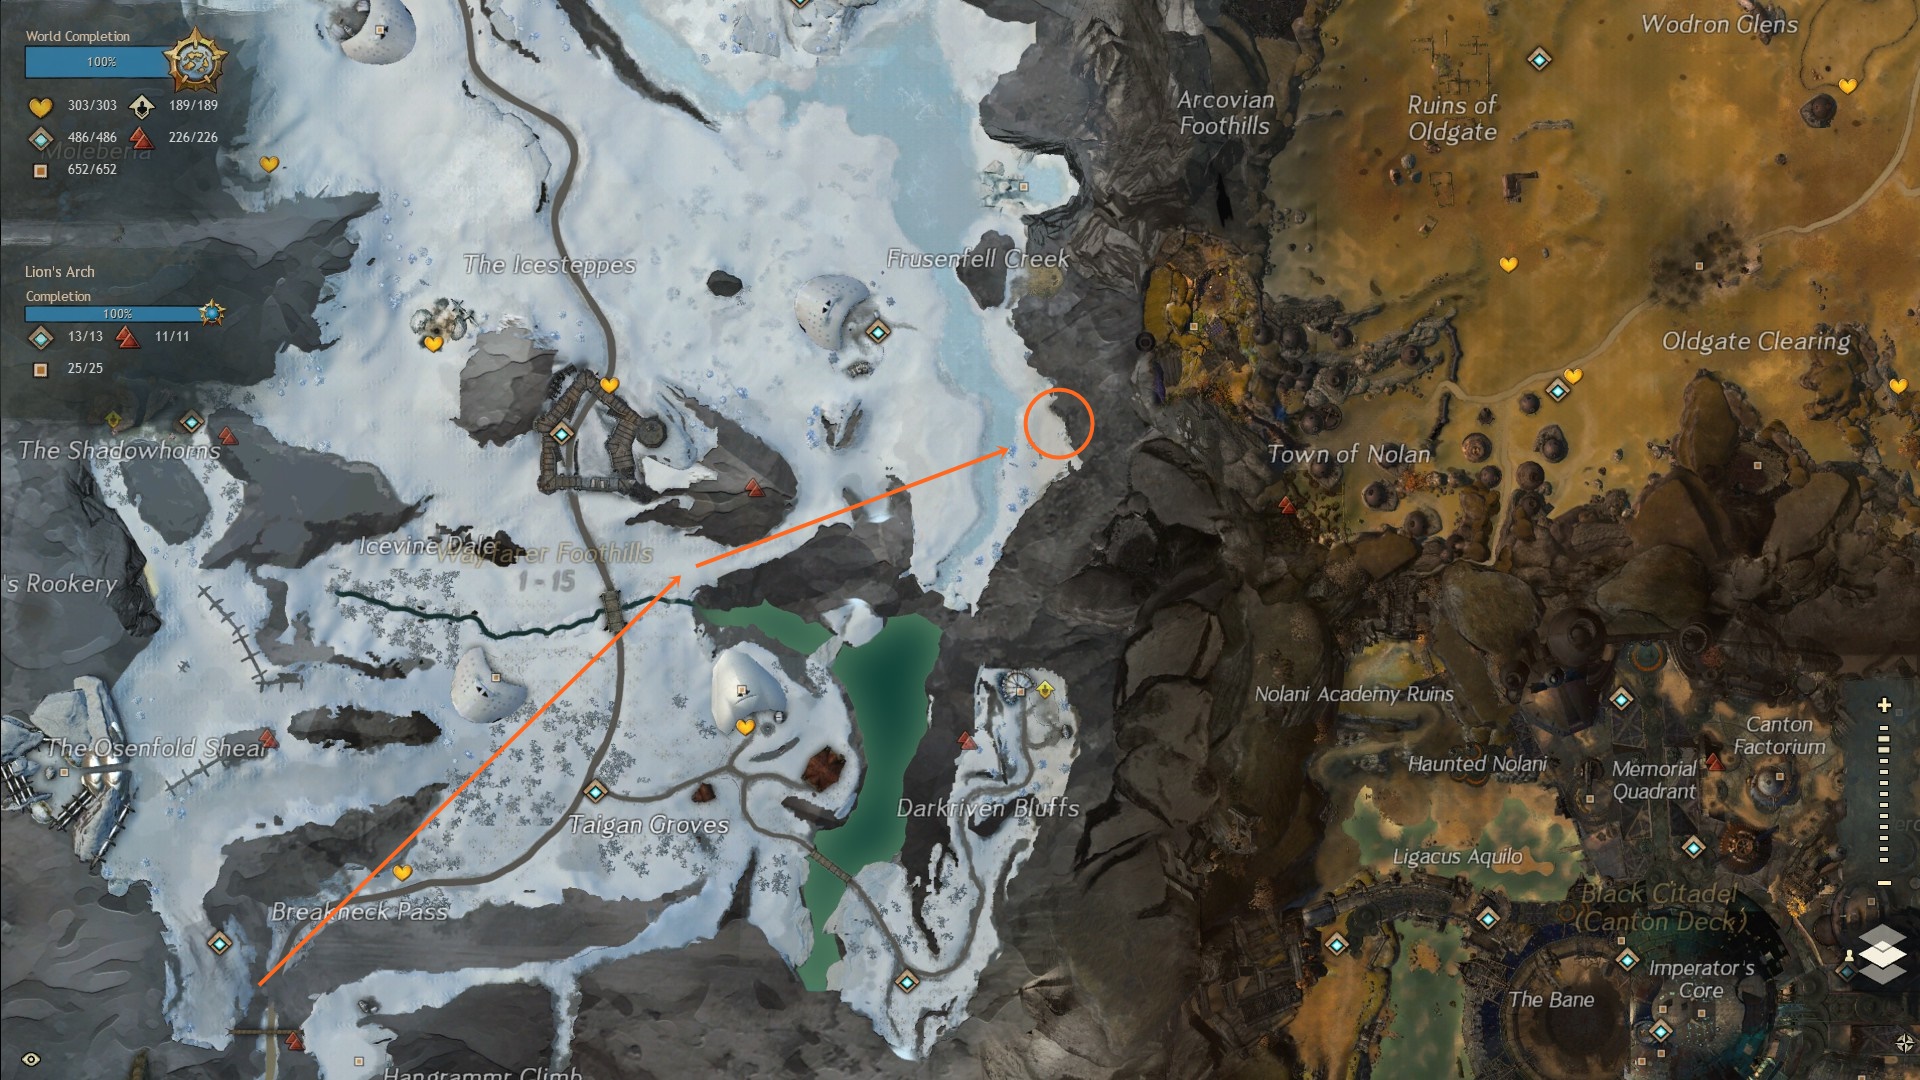
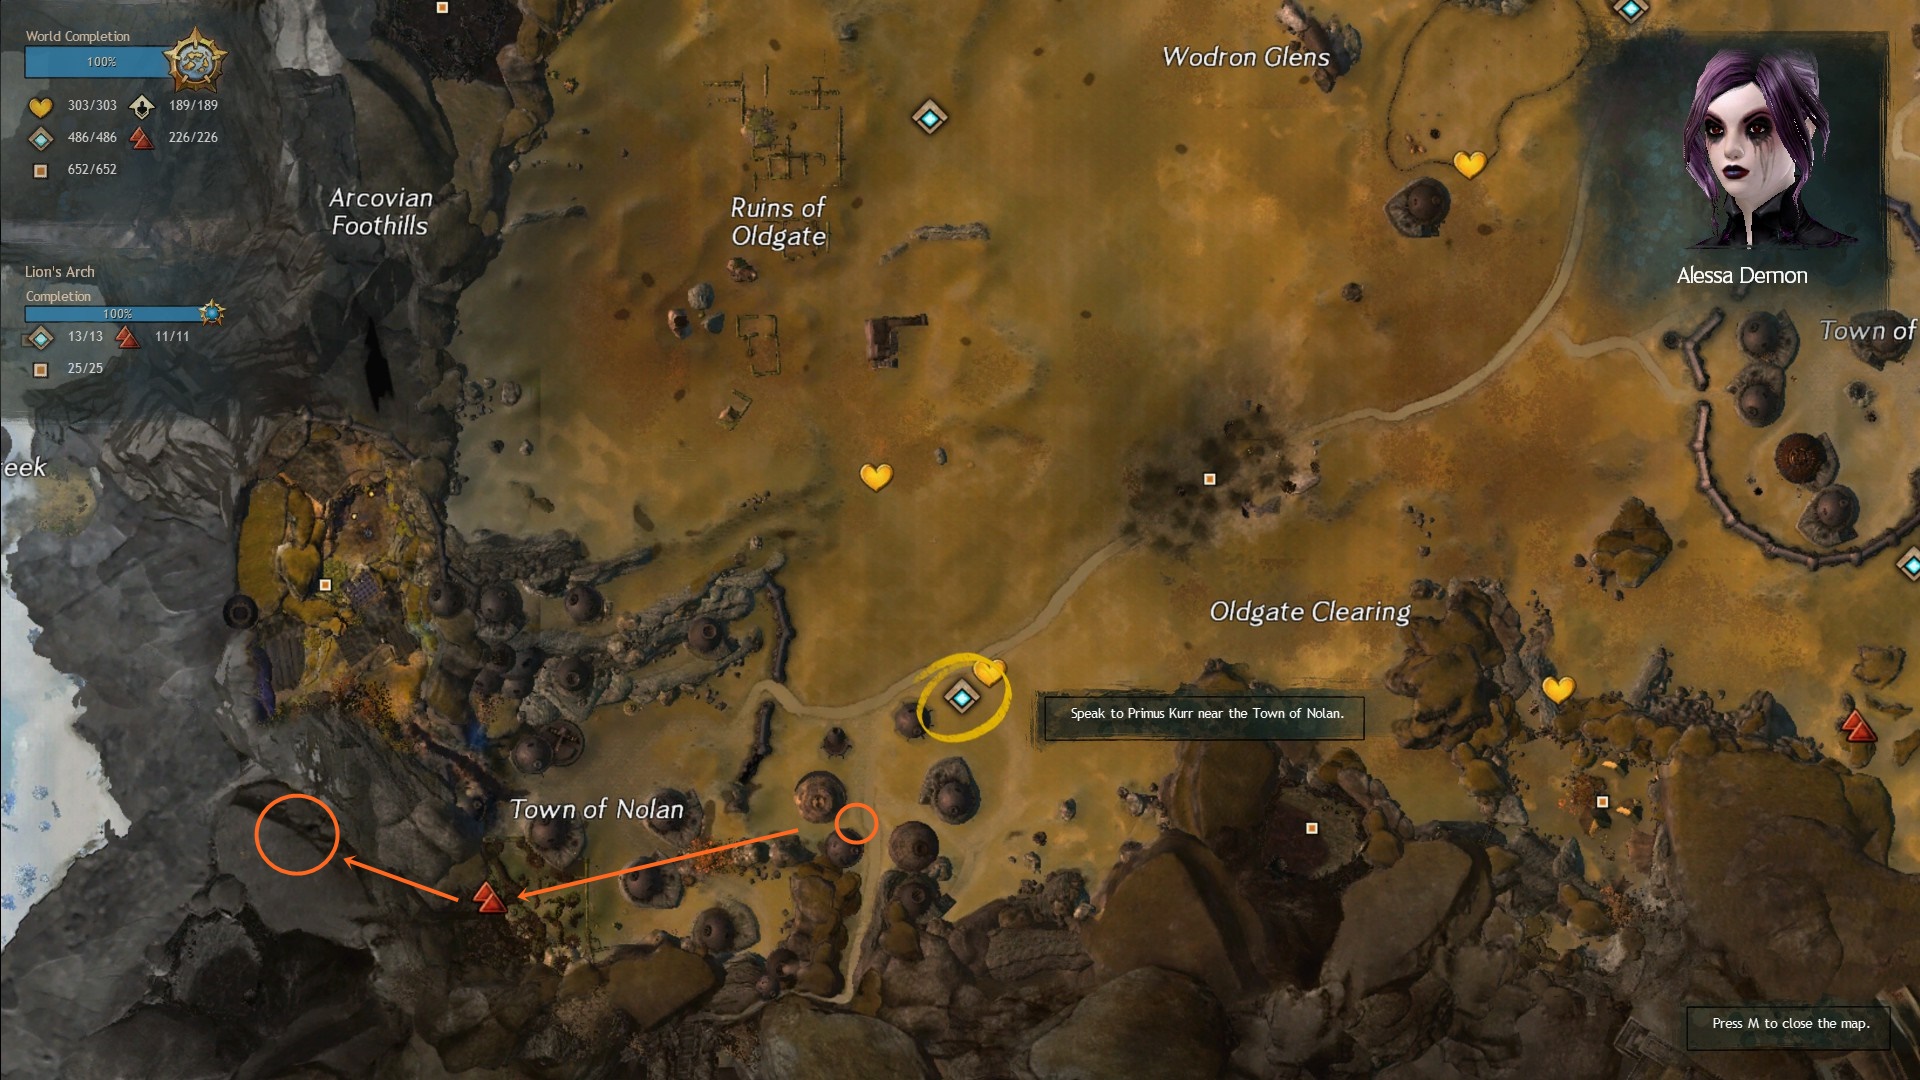
Entry 12: “Hours of trudging through the snow, yet still the beast eludes me. I need to rest in Nolan before I can complete the hunt. Perhaps I can learn something of value from the Nolan locals.”
Travel to Nolan waypoint in Diessa Plateau and speak to Primus Kurr located next to the portal leading to the Black Citadel (the first orange circle). Head west to the vista in the Town of Nolan. You will need to jump up the mossy cogs here, go through a pipe, and make your way into the cliff where you will find a cave with a strawberry patch in it (marked with the second orange circle). Here you need to speak to Anya Fairmind to complete the entry.
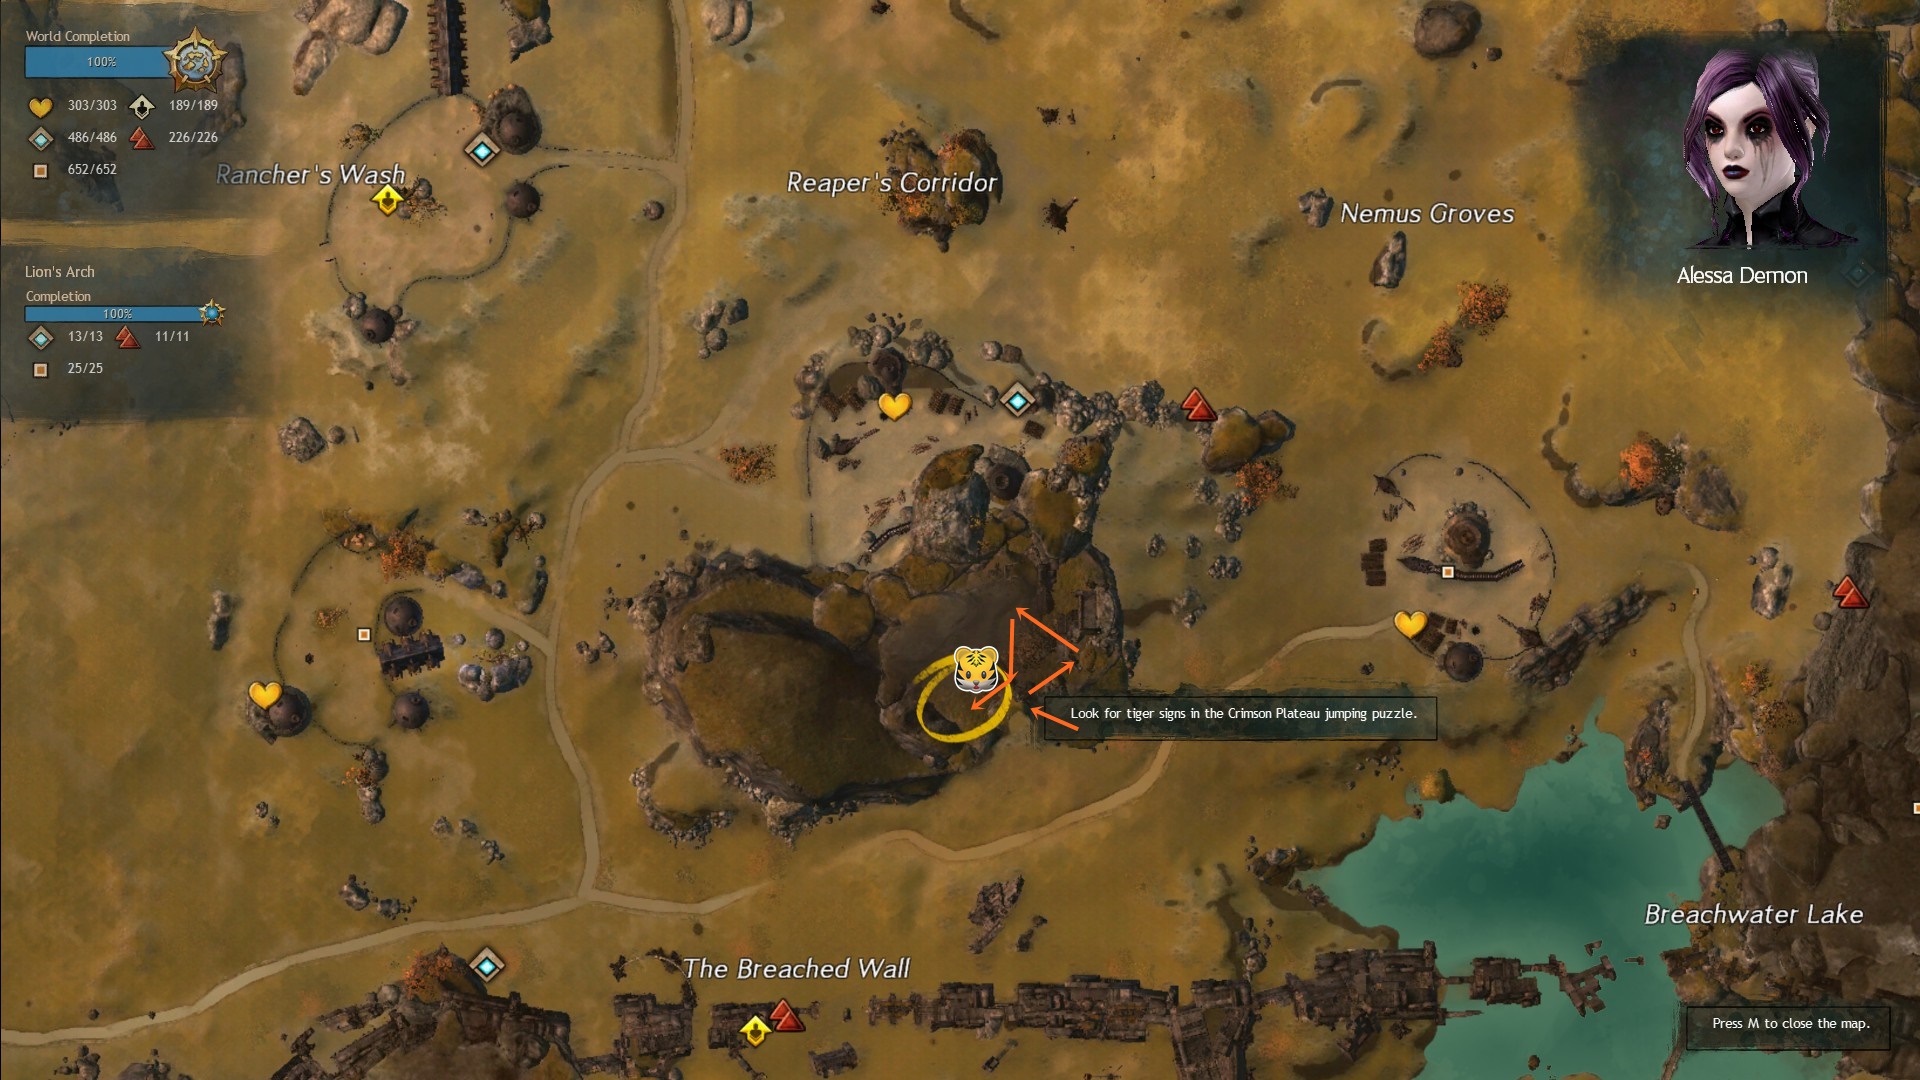
Entry 13: “The death toll rises. Nolan residents reported that an old soldier was attacked and killed not long before I arrived. His body was dragged west into the foothills. Searching west I met a young charr tending a strawberry garden. Her tale sounded a bit suspect, but it’s clear the tiger has turned east. I’ve picked up the trail again. If my suspicions prove true, it will lead me to the Crimson Plateau.”
You will need to do the Crimson Plateau jumping puzzle to complete this entry. The puzzle starts roughly where the orange arrows begin and follows the general direction of the arrows. You will need to jump to a hidden gap in a wall nearing the middle of the puzzle, so look up a video guide if you aren’t familiar with it.
There is also a tiger den on the way, at the very end of the puzzle it is on a ledge behind the huge tree just before you drop down to get the chest. It is only possible to get on this platform during the puzzle, so if you jump down to get the chest you will have to do the puzzle again to get the den (unless you have a Mesmer friend).
Signs of Tiger Habitation will be shown in the area where the chest is. Interact with the signs and Legendary Champawat will spawn again. Getting the tiger down to about 50% health will again cause it to run off and the entry will be completed.
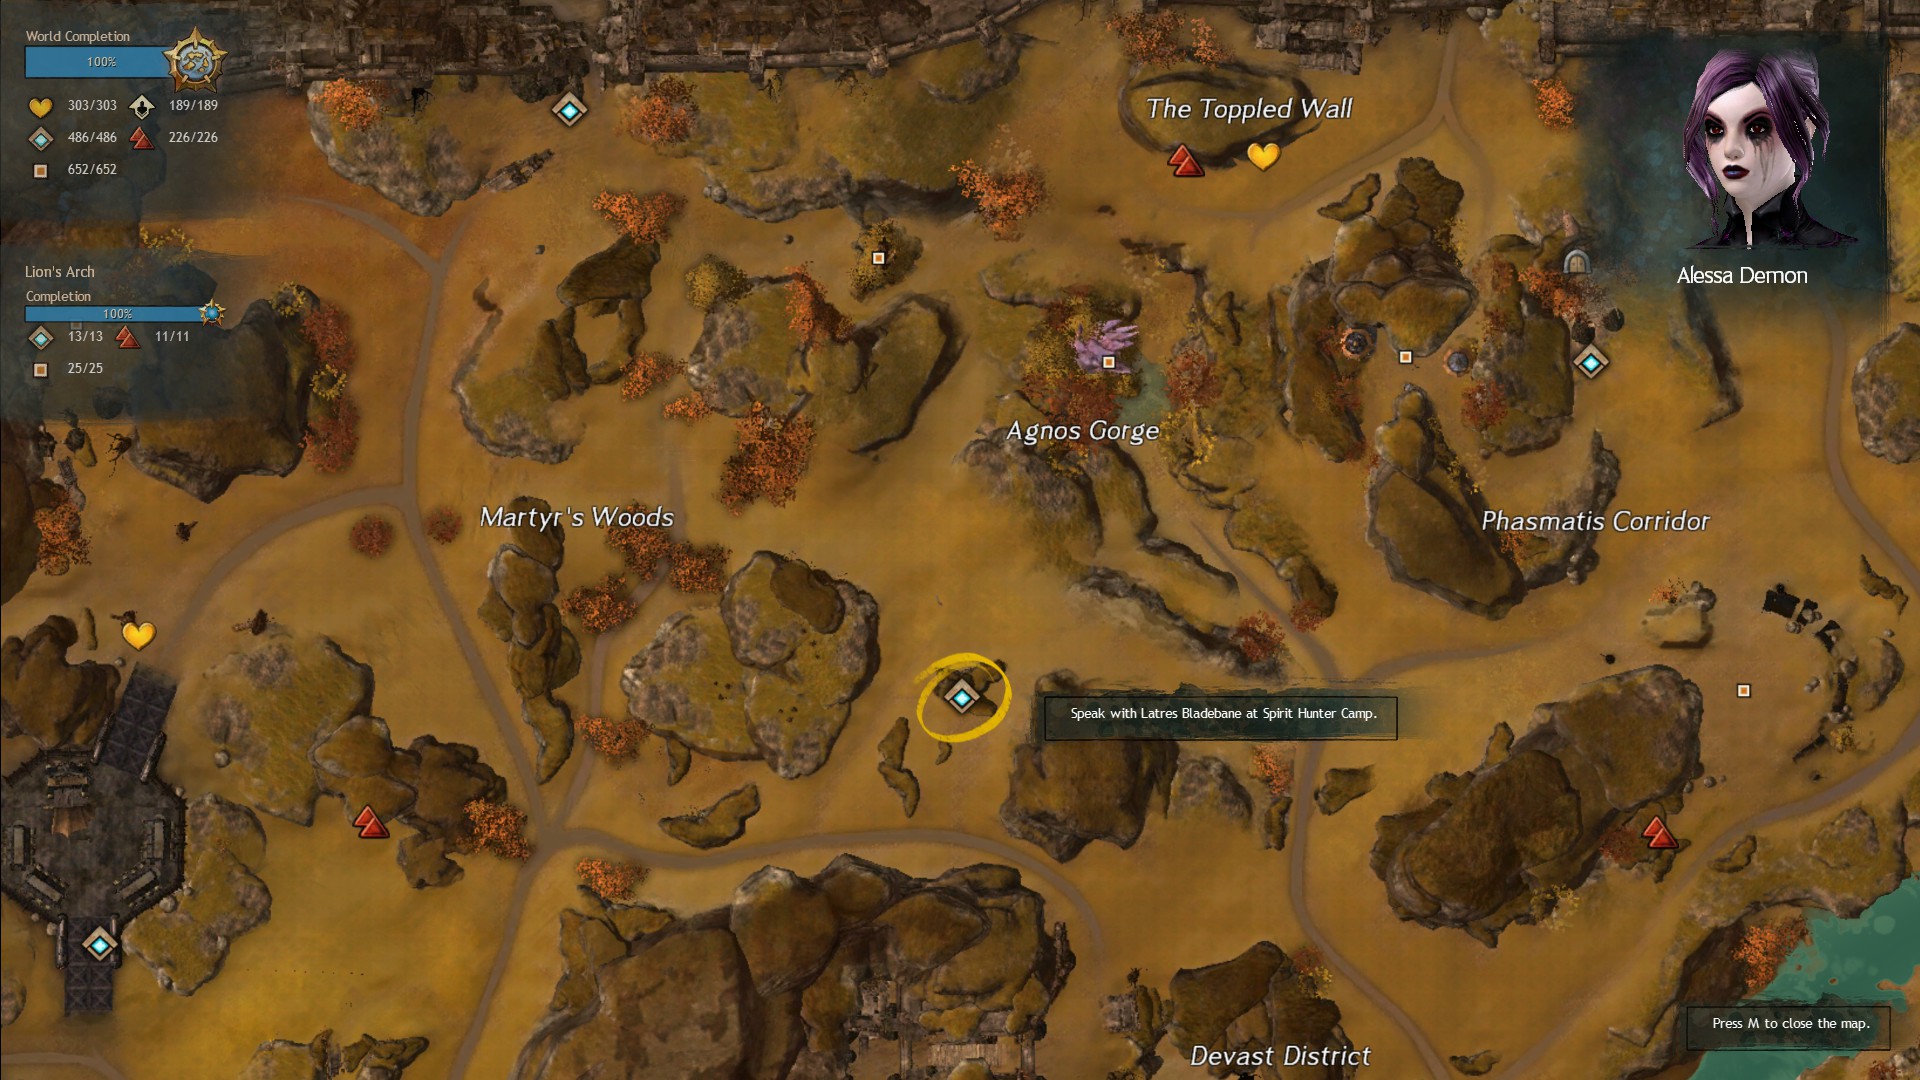
Entry 14: “I cornered her! Another brutal fight, but again she slipped away. She’s escaped south fleeing for Martyr’s Woods in the Plains of Ashford. I’ve lost the track. Hopefully the charr at Spirit Hunter Camp have seen something.”
Speak to Latres Bladebane located at Spirt Hunter Camp waypoint in Plains of Ashford. She is stood next to one of the tents by the waypoint. Speaking to her will complete the entry.
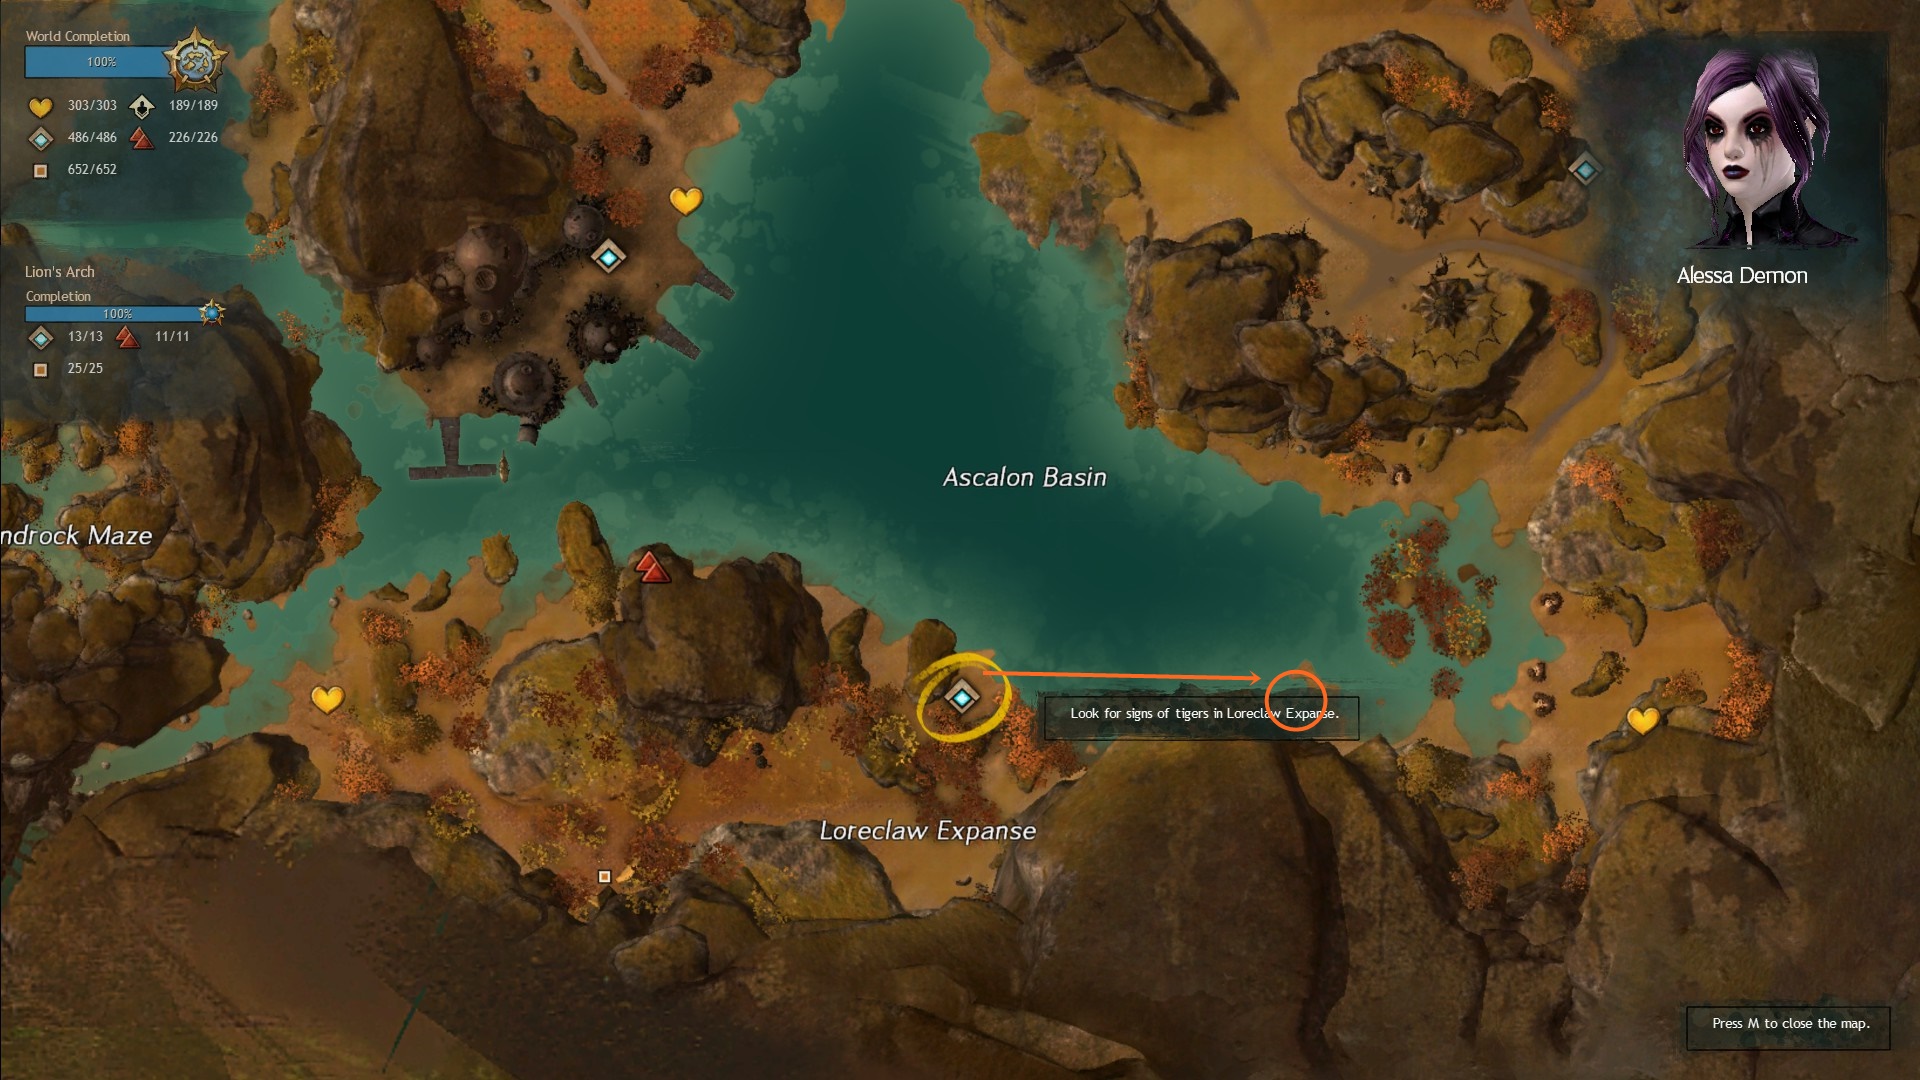
Entry 15: “Some charr at Spirit Hunter Camp tell me a tiger attacked them during the night. They fended the beast off without any casualties. The trail continues southeast. I expect it leads to Loreclaw Expanse.”
Travel to Loreclaw Waypoint and head east through the water. You will find more Signs of Tiger Habitation just on the shoreline. Interact with them to complete the entry.
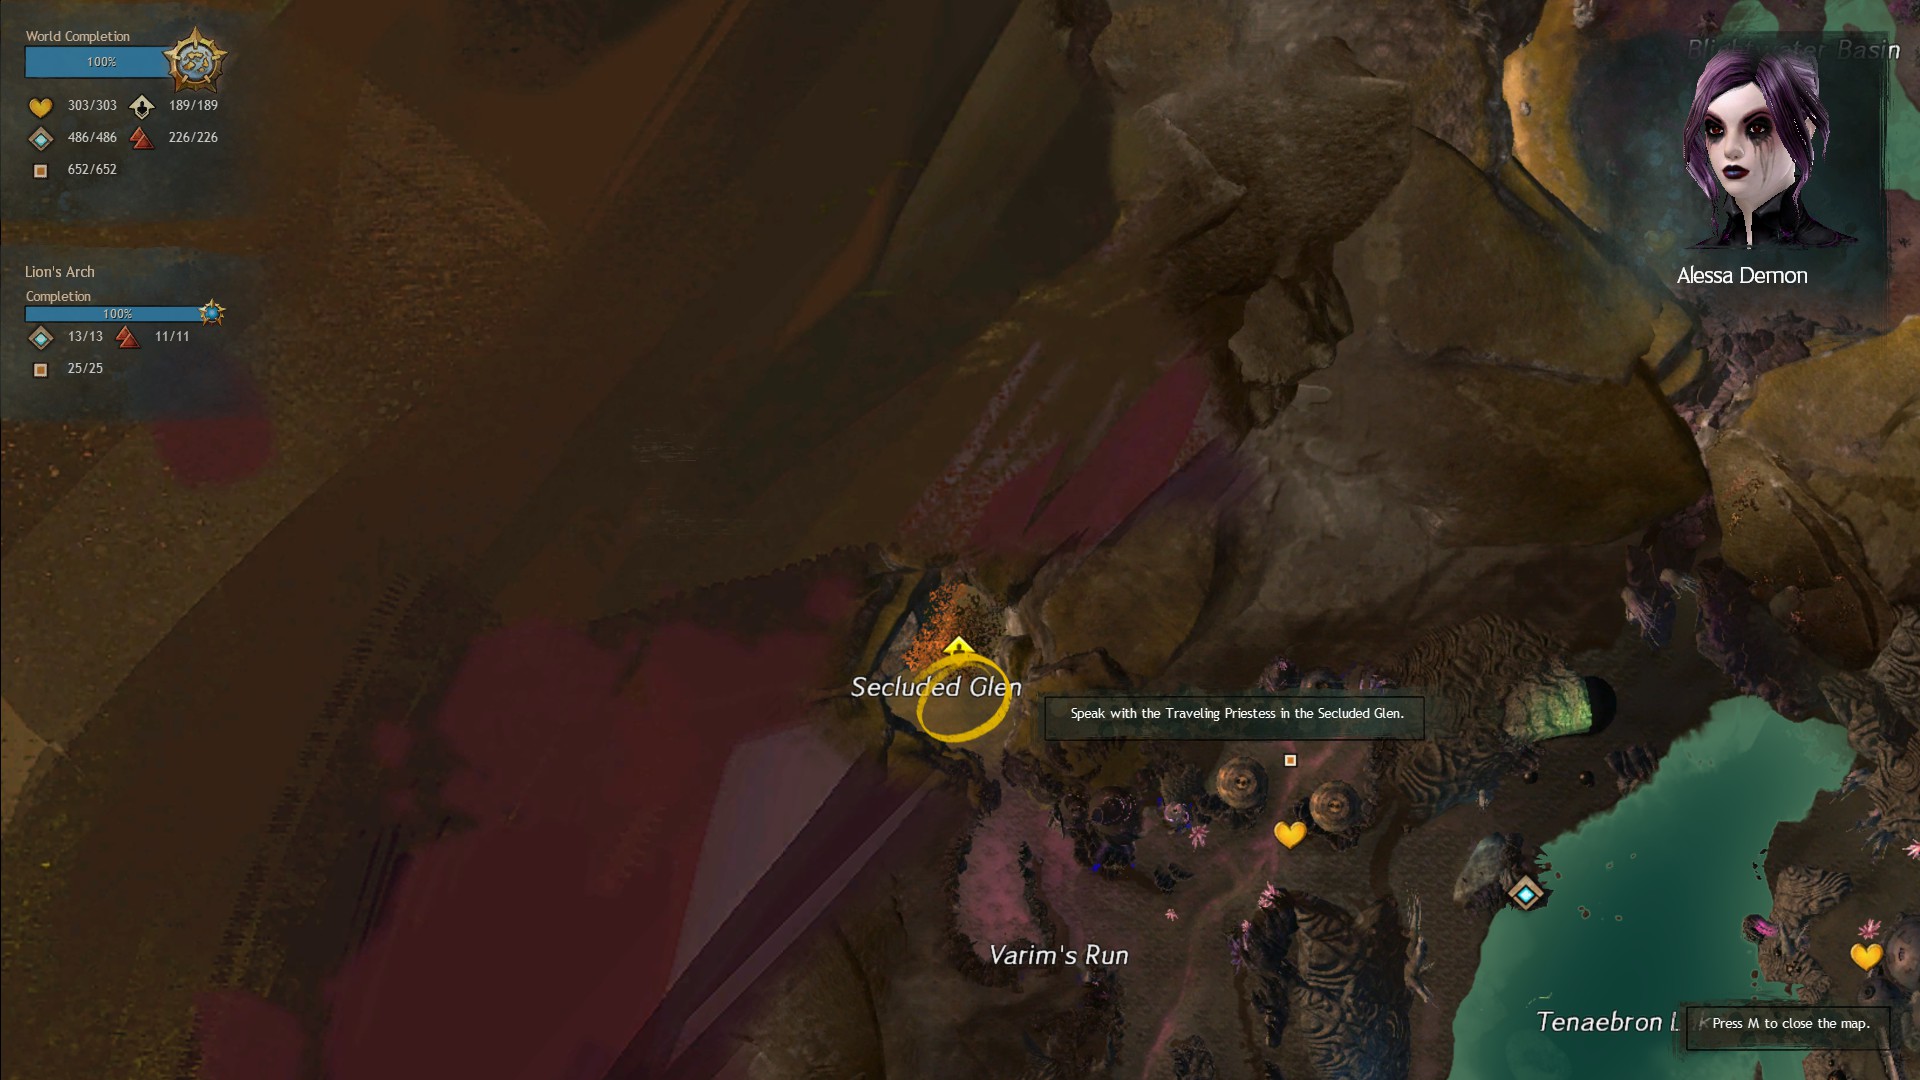
Entry 16: “I uncovered ample evidence of her passing near a separatist camp in Loreclaw Expanse. I’ve tracked her south but her path is too treacherous for me to traverse. I’ll cut her off at Secluded Glen.”
Travel to Tenaebron Waypoint in Fields of Ruin and head northwest to the Secluded Glen where the hero point is (very furthest point in the top left corner of the map). Talk to the Travelling Priestess to complete this entry.
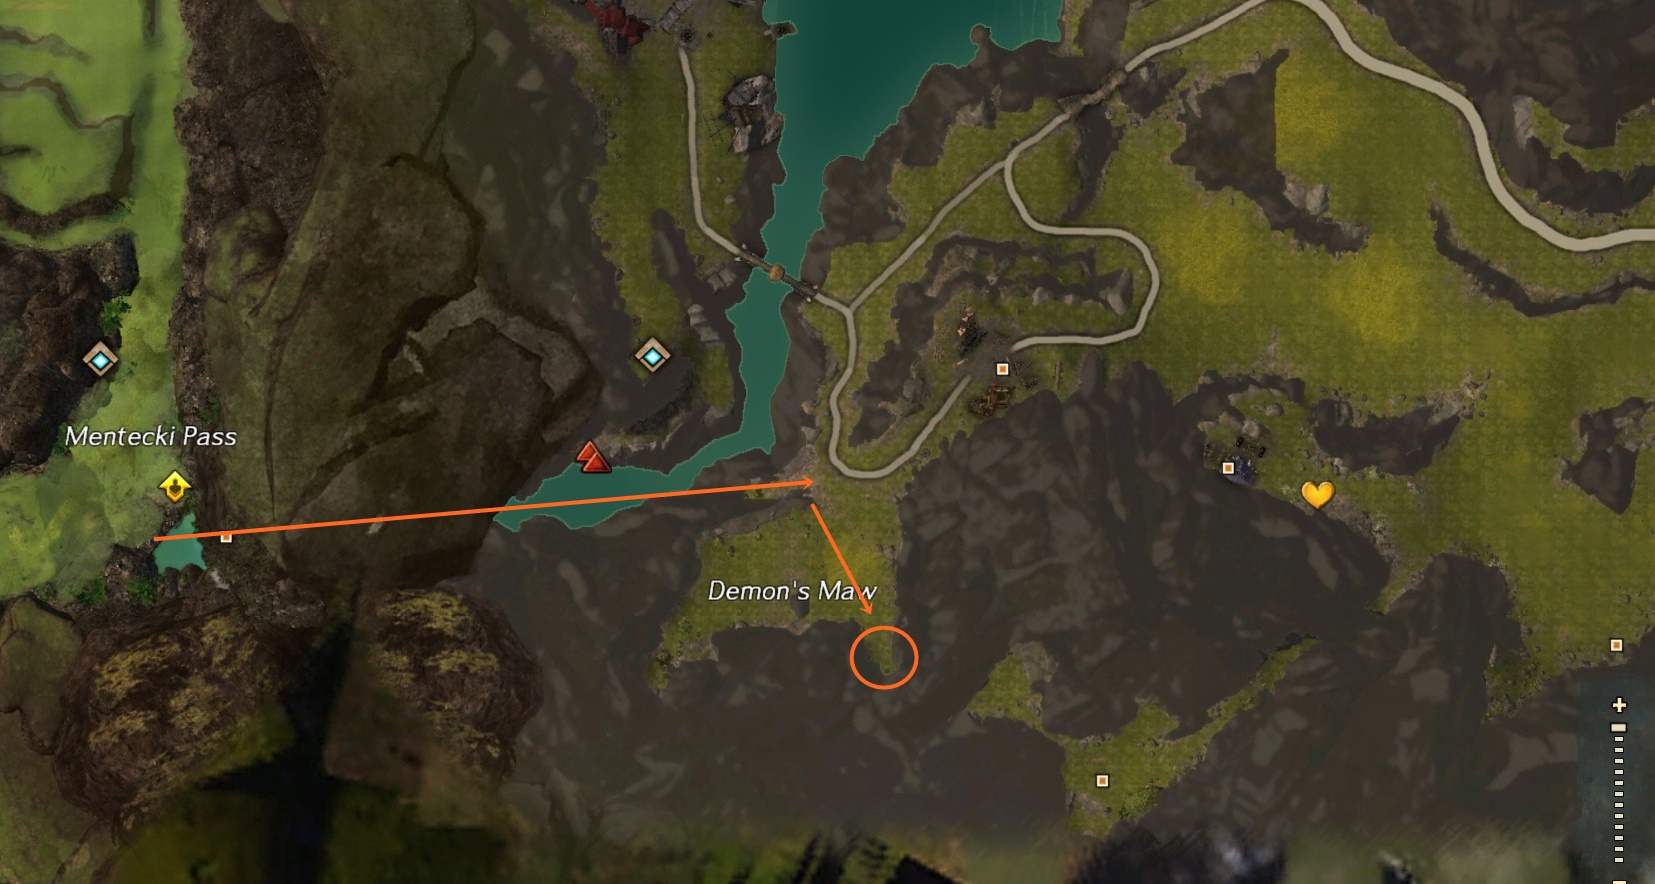
Entry 17: “Incredible! A travelling priestess at Secluded Glen told me she saw the tiger pass through and – with no hesitation – proceed into the Dragonbrand. The Brand is terrifying for a well-trained warrior – I can’t imagine what courage that tiger must possess. I’ll resume my search around Sentinel’s Perch. If she somehow survived the Brand, that’s her likely destination.”
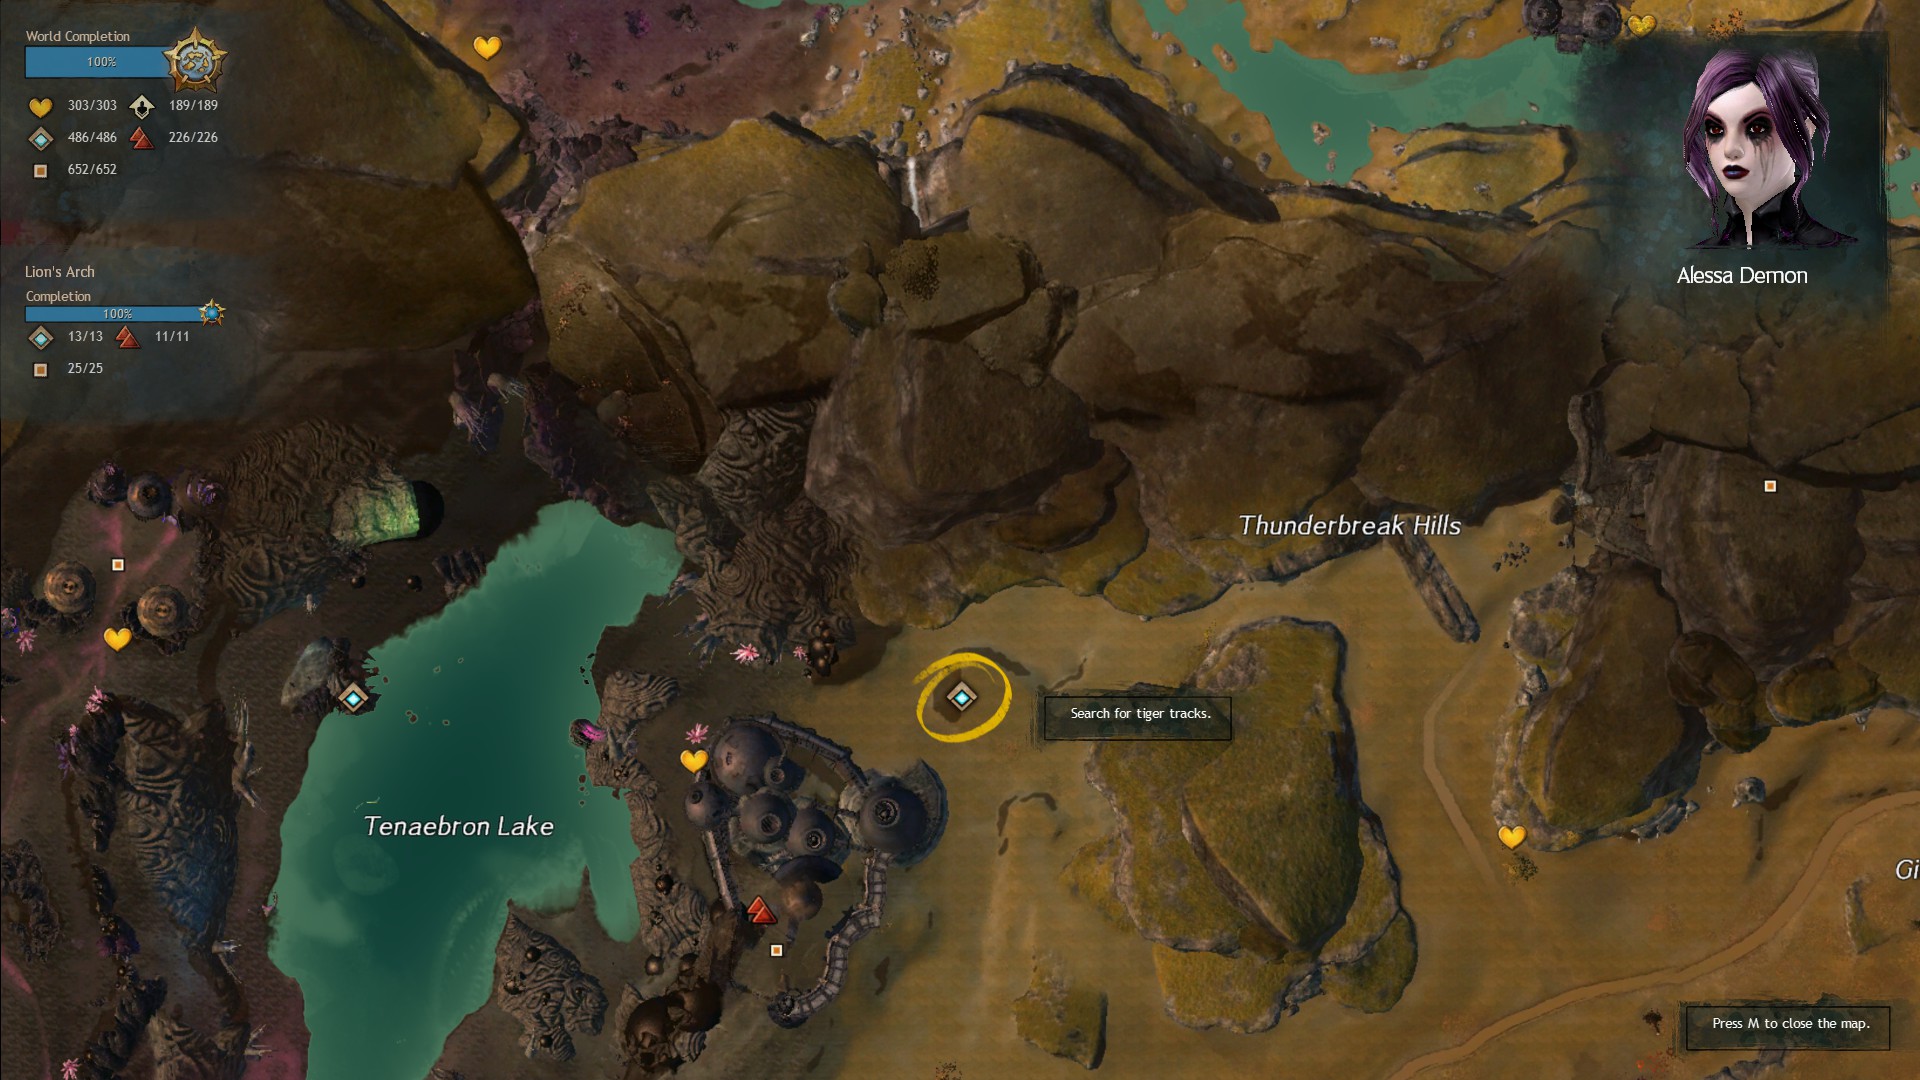
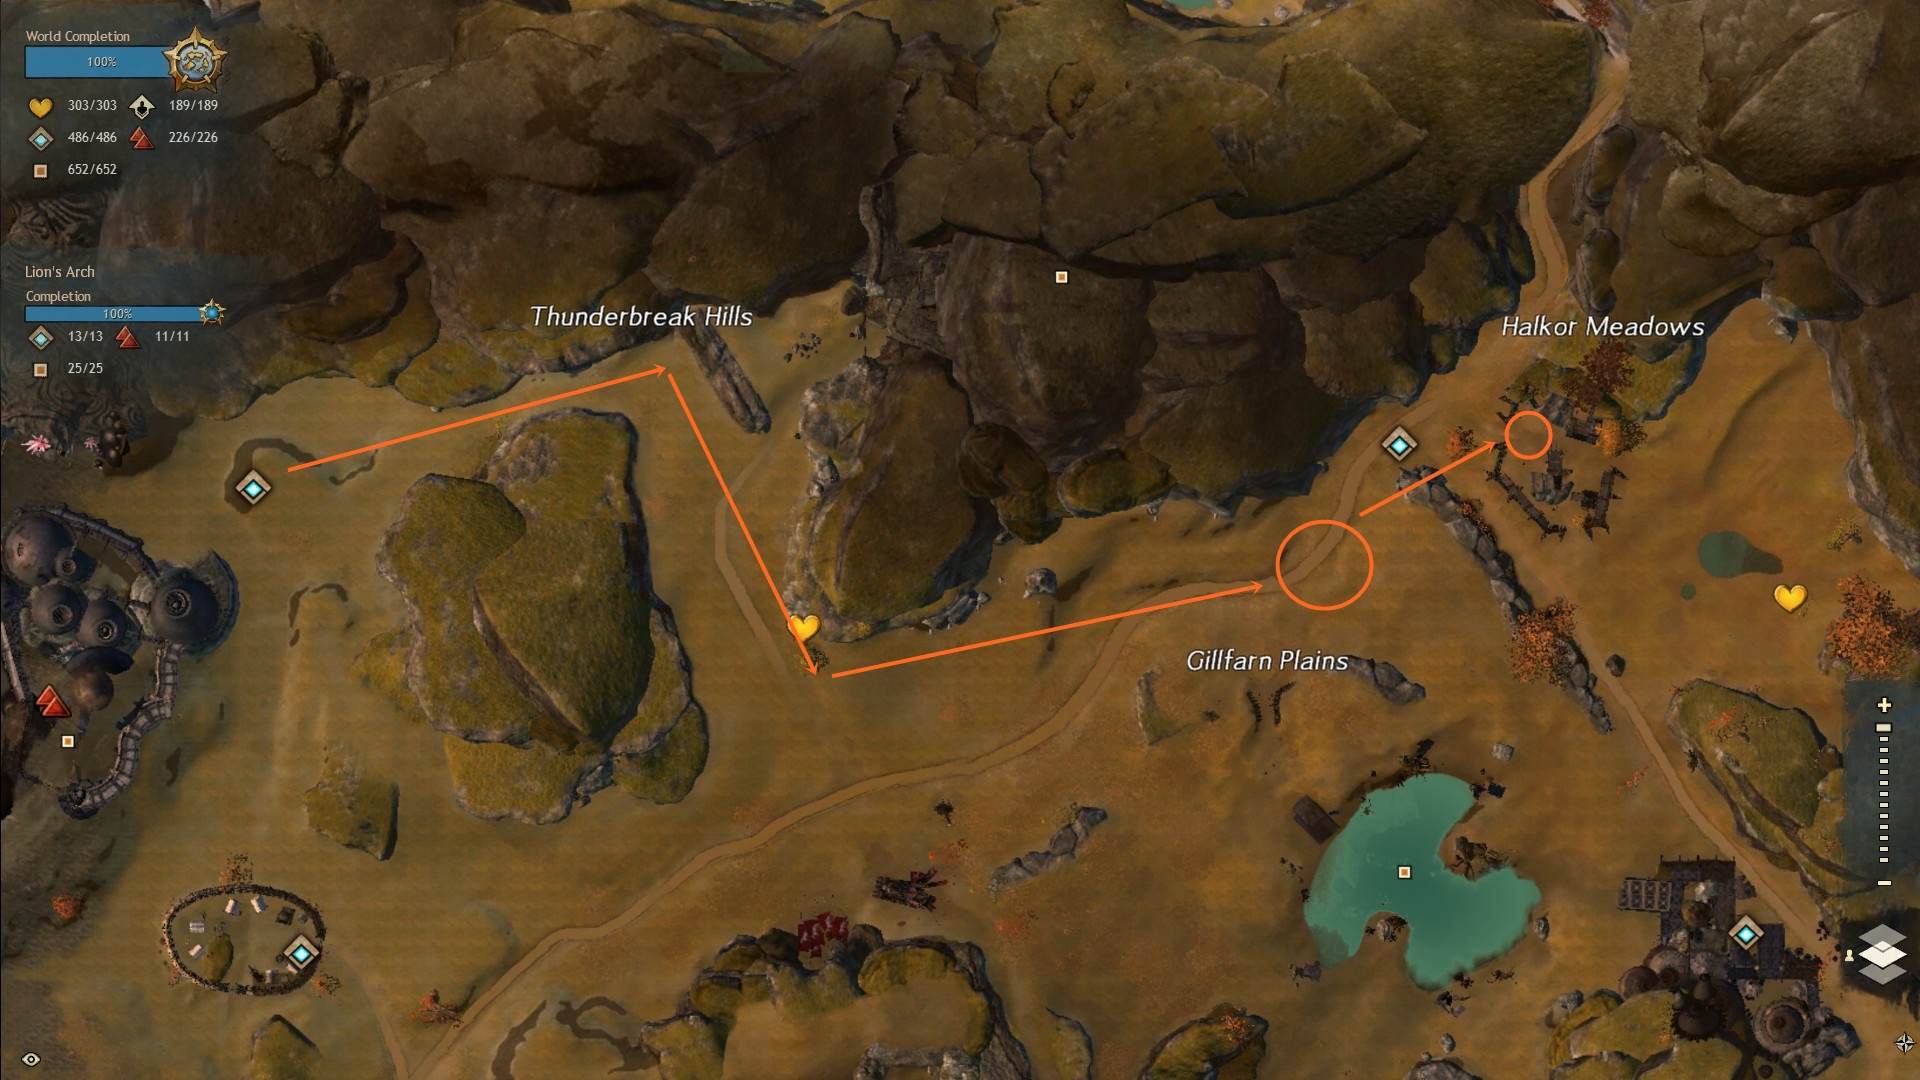
Travel to Thunderbreak waypoint in Fields of Ruin. Head east and follow more tiger tracks until you come to some Obscured Tiger Tracks. Interact with them and you will be directed to Captain Carbins (at the second orange circle). Speaking to him will complete the entry.
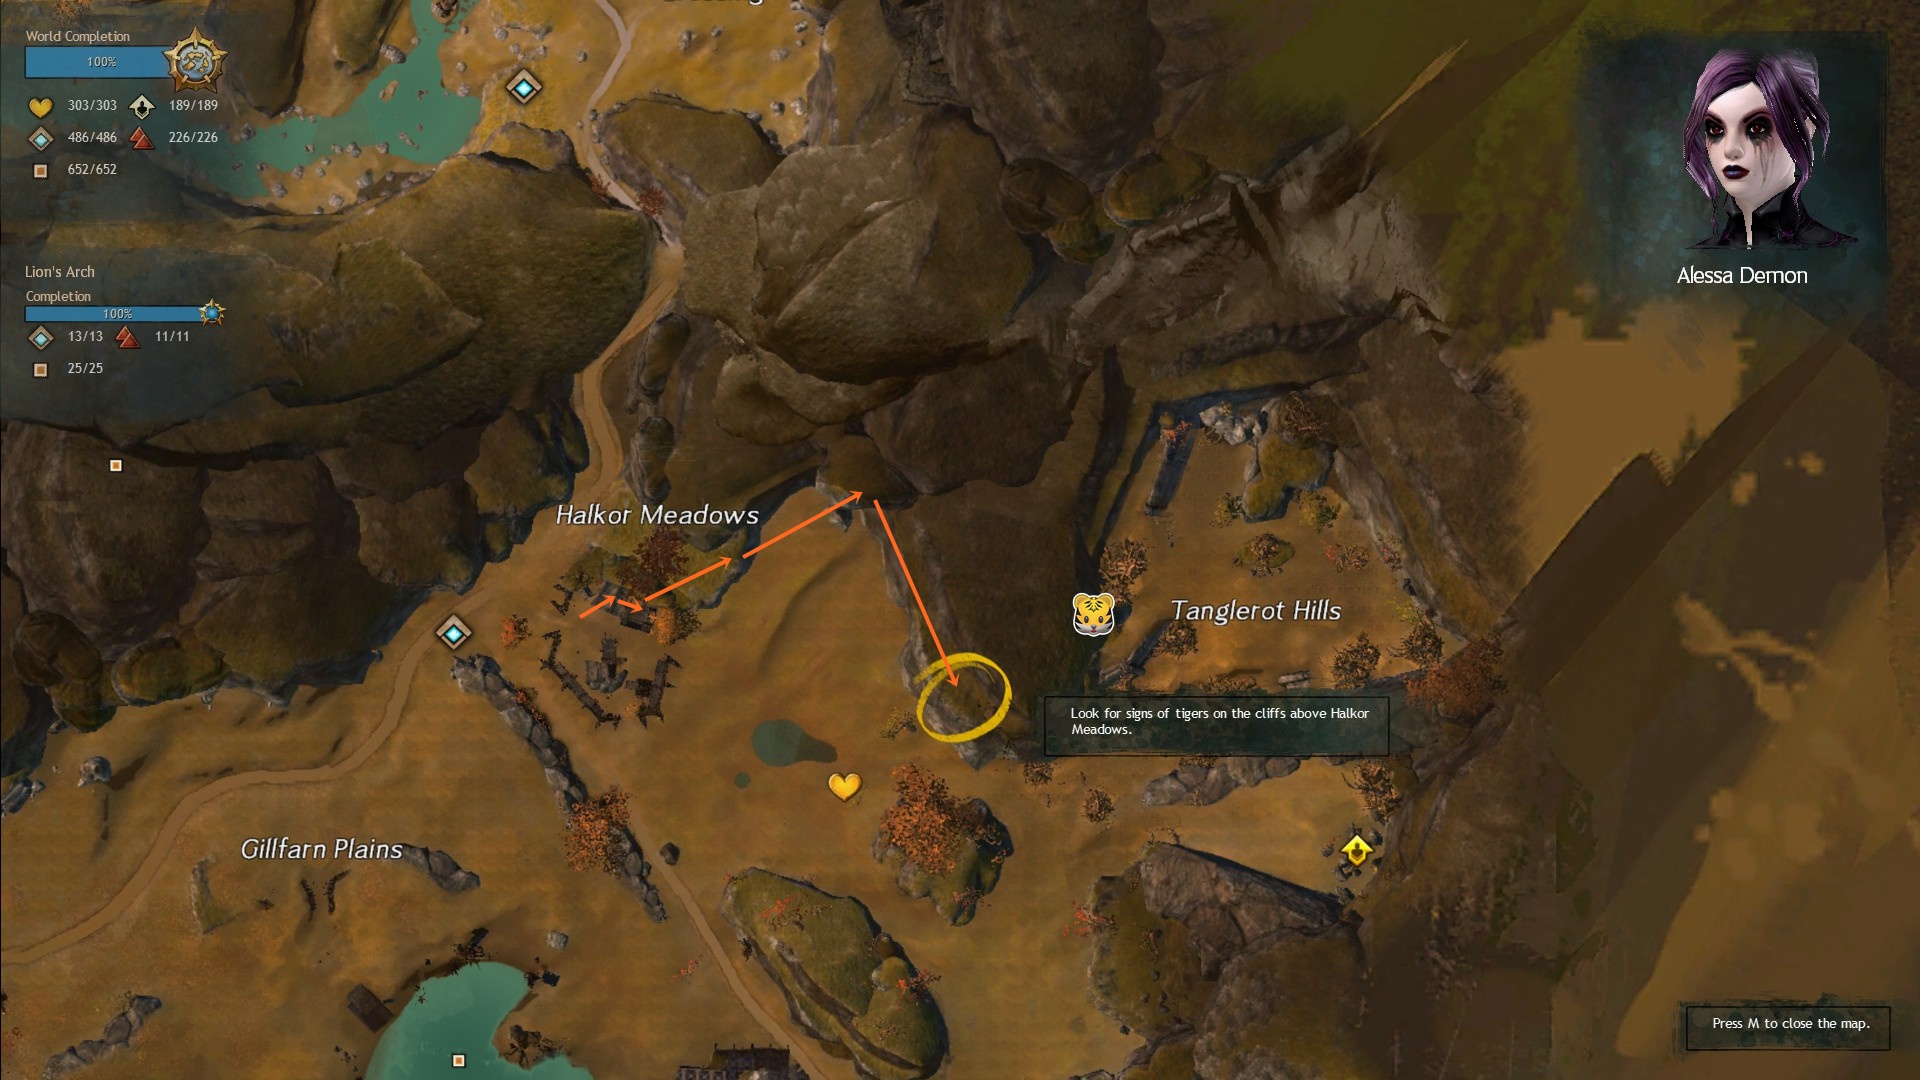
Entry 18: “A villager at Halkor Meadows is missing. Apparently the beast is still hungry for flesh. An Ebon Vanguard member searching for the missing villager was mauled near the cliffs north of the village. I go north.”
You need to get up the cliff for this entry. Use the wooden structure in the village to get onto the cliffs, then jump to the next cliff using the stone pillars (the arrows mark the rough direction). When you reach the top of the cliff there will be more Signs of Tiger Habitation. Interact with it to spawn Legendary Champawat at 50% health. You will need to kill the tiger to complete the entry.
There is also another tiger den here (marked with the tiger face). Go to the edge of the cliff and head east round the back. The tiger den is on a lower ledge you can glide to.
Entry 19: “The beast is slain! The countryside is finally safe from her murderous rampage! I’m exhausted. I’ve rarely seen creatures so relentless, so single-minded in their will to survive. Time to return to Bagred the Hunter, he’ll want to hear the details of this hunt.”
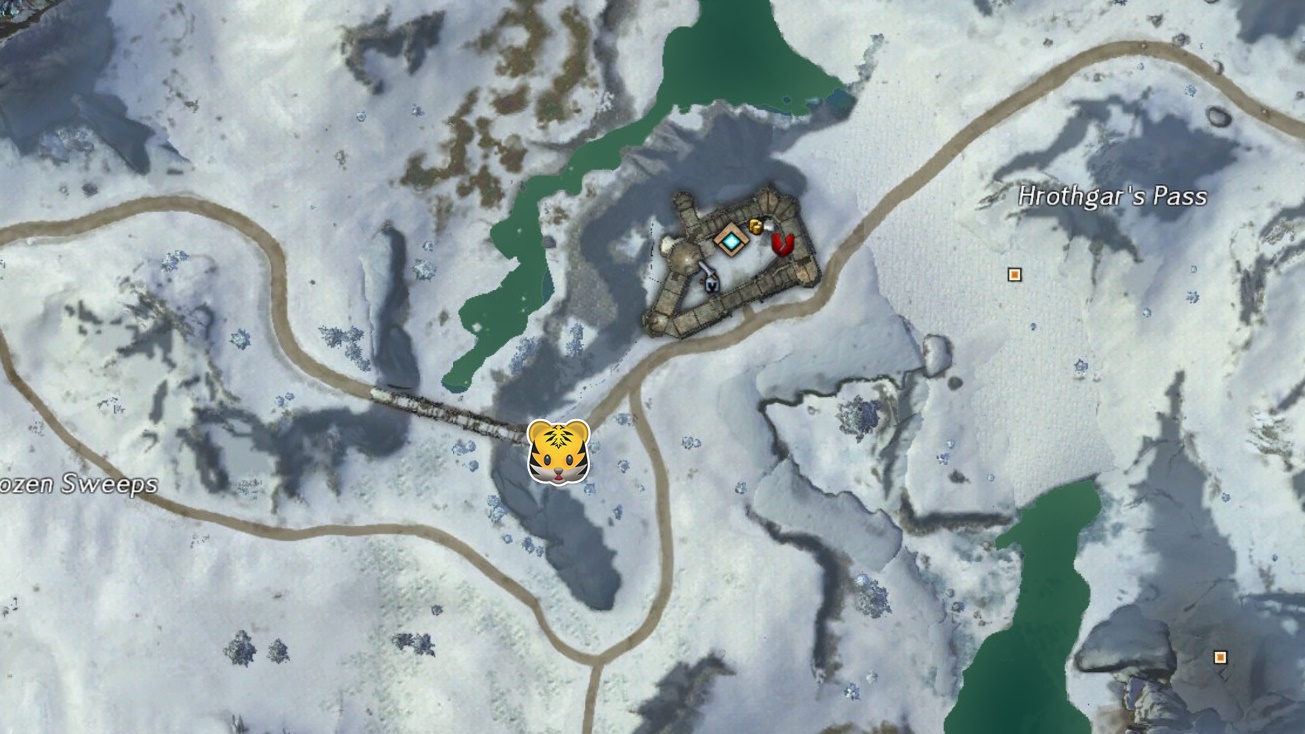
Travel to Snowdrift Haven waypoint and head south west towards the bridge where you will once again find Bagred the Hunter. Speak to Bagred and tell him you’ve completed the journal.
This will complete the journal and award you with a Completed Hunter’s Journal. The completed journal will also count towards the Chuka and Champawat Vol 1: The Hunt collection.
Entry 20: “Warming my sore bones by a norn campfire, I’m unsure how to wrap up this journal. I started this hunt seeking a challenging game. I ended up with quite a bit more than I’d bargained for, tracking a pair of vicious creatures over vast territory. Their tenacity was unparalleled. In the end I’m pleased I could bring an end to the tigers’ wanton violence, but a part of me can’t help but wonder what drove these creatures to madness.”
Stay tuned for Chuka and Champawat Vol 2 and a full Spirit of the Tiger achievement guide!
GW2: Chuka and Champawat Guide Vol 1: The Hunt
About a year ago now I started crafting the Legendary Weapon, Chuka and Champawat. Originally I started crafting The Dreamer but when Chuka was released and I found out about you could carry Tiger Cubs on your back I just had to have this instead. Although I haven’t quite completed crafting the final Legendary tier, I thought I would post a guide telling you about the process as it’s very long and has a lot of additional collections to complete.
As this weapon was released after the Heart of Thorns expansion, it requires the Maguuma Mastery Legendary path to craft this which also makes this weapon account bound and unable to sell (which means you can’t buy it either). So unfortunately… if you want this weapon, you’re going to have to go down the painful route of crafting…
But before you start, you need to have the Central Tyria Legendary Crafting – Revered Antiquarian mastery unlocked and a Huntsman at least level 400.
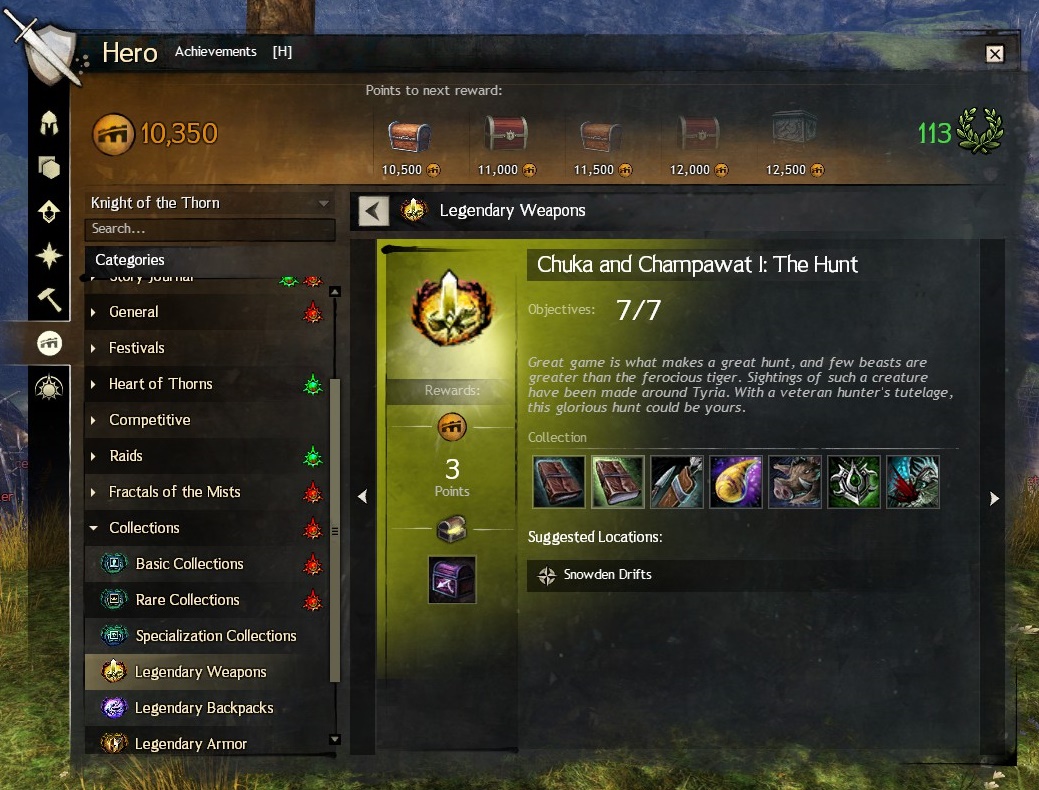
This is the Achievement log for the collection located in the Achievement tab under Collections, Legendary Weapons. Firstly you need to speak to Grandmaster Craftsman Hobbs (in the crafting area in Lion’s Arch) to buy the Chuka and Champawat Vol 1 recipe for 5 gold and 10,003 karma (I don’t know why it’s 10,003 and not 10,000… it just is).
This will now unlock the collection and you can start your crafting journey! So going from left to right of the collection:
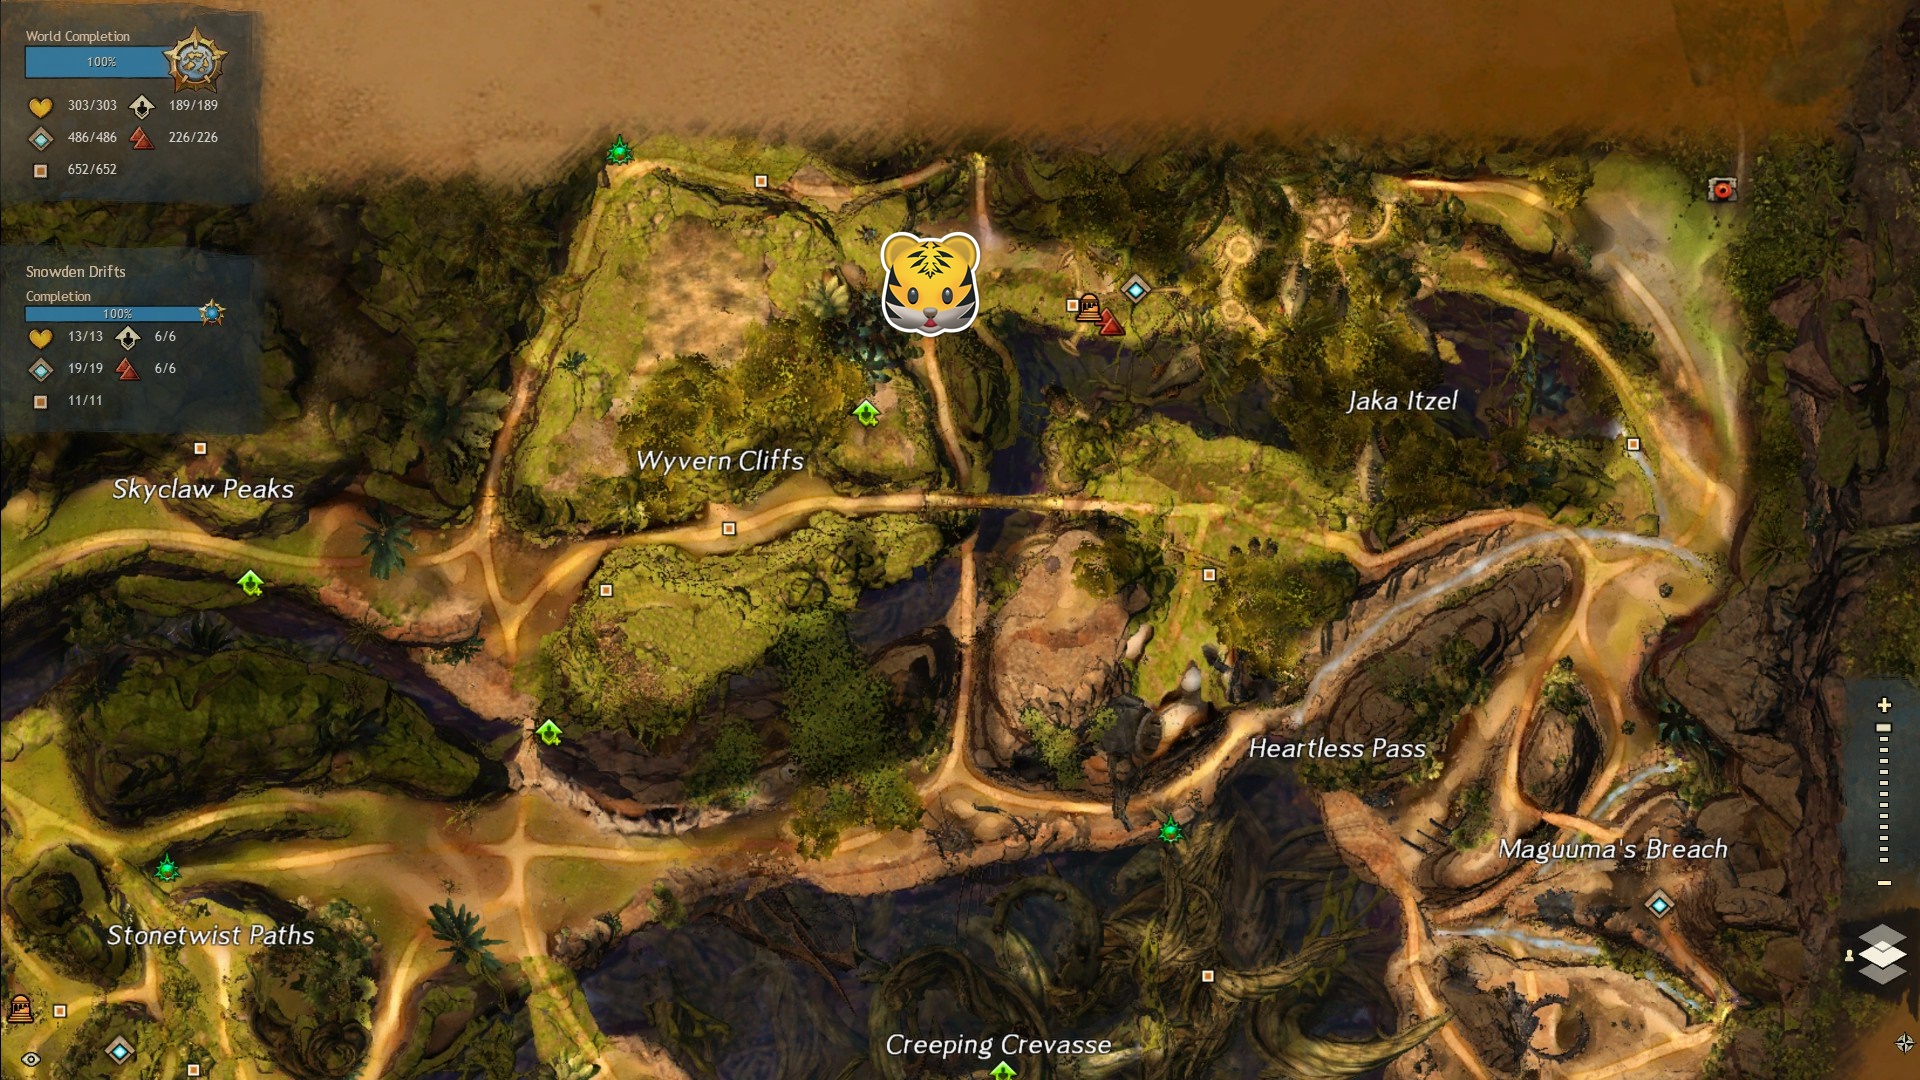
1. Hunter’s Journal. This is an item that needs to be crafted. Firstly you need to pick up the recipe from Bagred the Hunter in Snowden Drifts. He will give you a recipe for “Crude Leather Book” which you will need a level 400 Huntsman to craft. You will need 12 Cured Thick Leather Squares, 6 Thick Strings (3 Cured Thick Leather Squares per string) and 40 Elder Wood Planks to craft this. When you have crafted this talk to Bagred again to unlock the next collection. Bagred can be found where I placed the 🐱
2. Completed Hunter’s Journal. Creating the Hunter’s Journal and speaking to Bagred will unlock an additional collection which needs to be completed to be awarded the Completed Hunter’s Journal (see picture below). There are 19 steps to this collection which require you to go to certain places throughout the world to complete. It’s fairly easy to follow but here’s my Hunter’s Journal Guide if you require it. The trail you will follow will also lead you to some tiger dens for the achievement “Spirit of the Tiger” (which will reward you with 11AP and a Mini Tiger Spirit) so it’s a good opportunity to do this achievement at the same time.
3. Hunter’s Kit. Again, talk to Bagred and he will give you the recipe for the Hunter’s Kit. A level 400 Huntsman is needed again to craft this. You will need 15 Cured Thick Leather Squares, 15 Thick Leather Strings, 15 Elder Wood Dowels and 15 Elder Harpoons (2 Elder Wood Planks and 2 Mithril Ingots per Harpoon). Once crafted, this will complete this section of the collection.
4. Tiger Musk. This is an item dropped rarely from killing tigers. You will need to go to the HoT areas to find Tigers to kill. I went to Teku Nuhoch in Tangled Depths for this and only had to kill about 4 tigers before the item dropped, but that may have just been luck so keep going if you don’t get the drop straight away. Verdant Brink is probably the place with the most tigers, so there is your best chance.
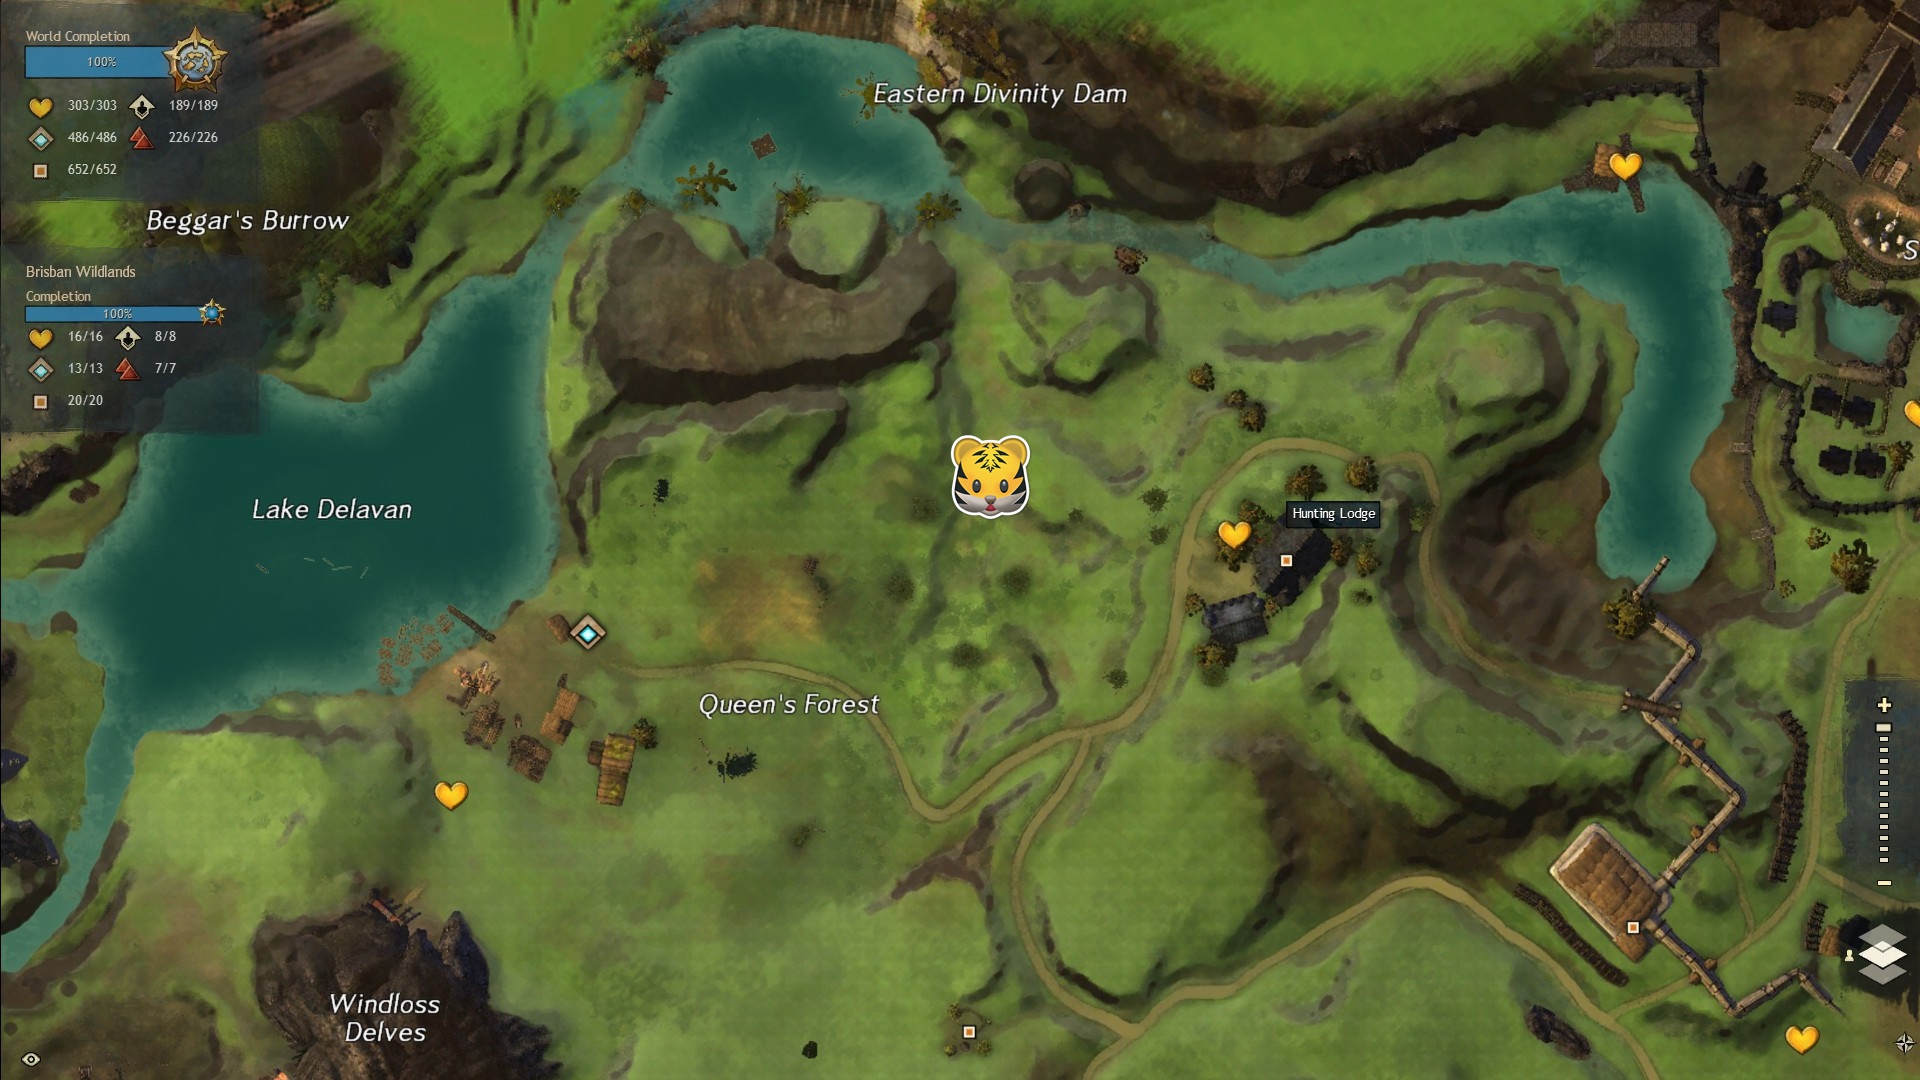
5. Warm-Up Hunt. For this achievement you need to Kill the Boar in the “Hunt and slay the Giant Boar” event located in Queen’s Forest in Queensdale. If the event is not active then speak with Lodgemaster Carthage in the hunting lodge to start the event. The event happens roughly where the 🐱 is displayed.
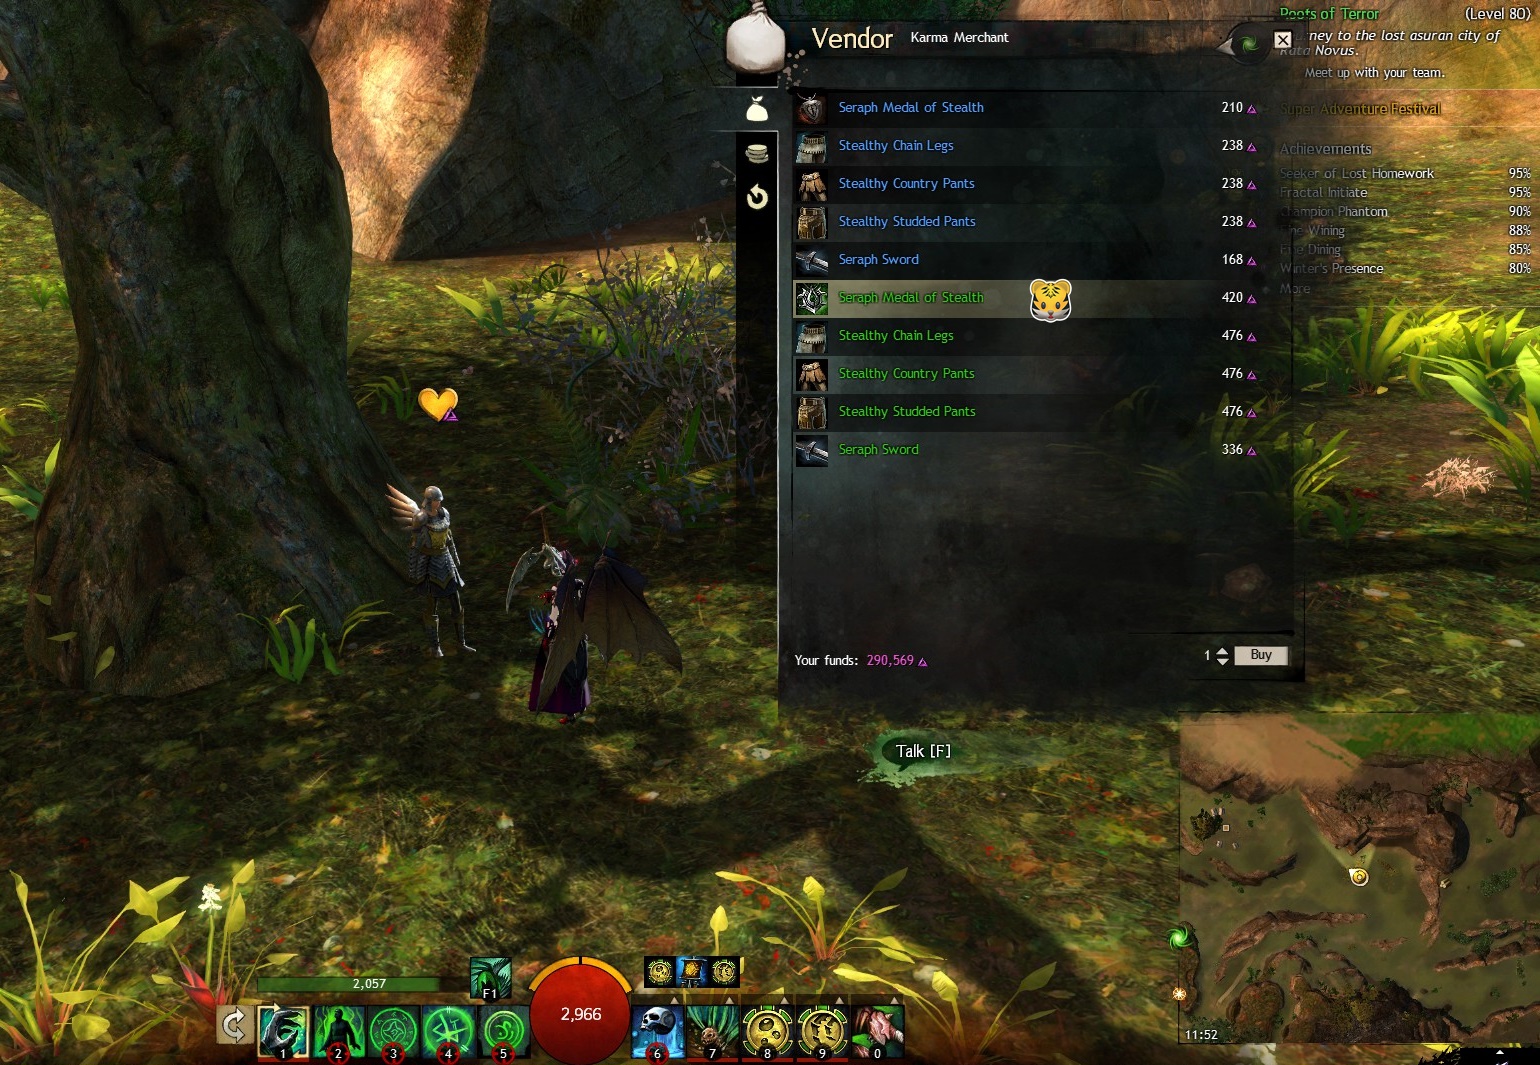
6. Seraph Medal of Stealth. This item is purchased from Seraph Watchman Morina in Brisban Wildlands. You need to complete the Heart “Help Hinder Scotta’s Bandits” in order to access the items available to purchase. The medal costs 420 Karma.
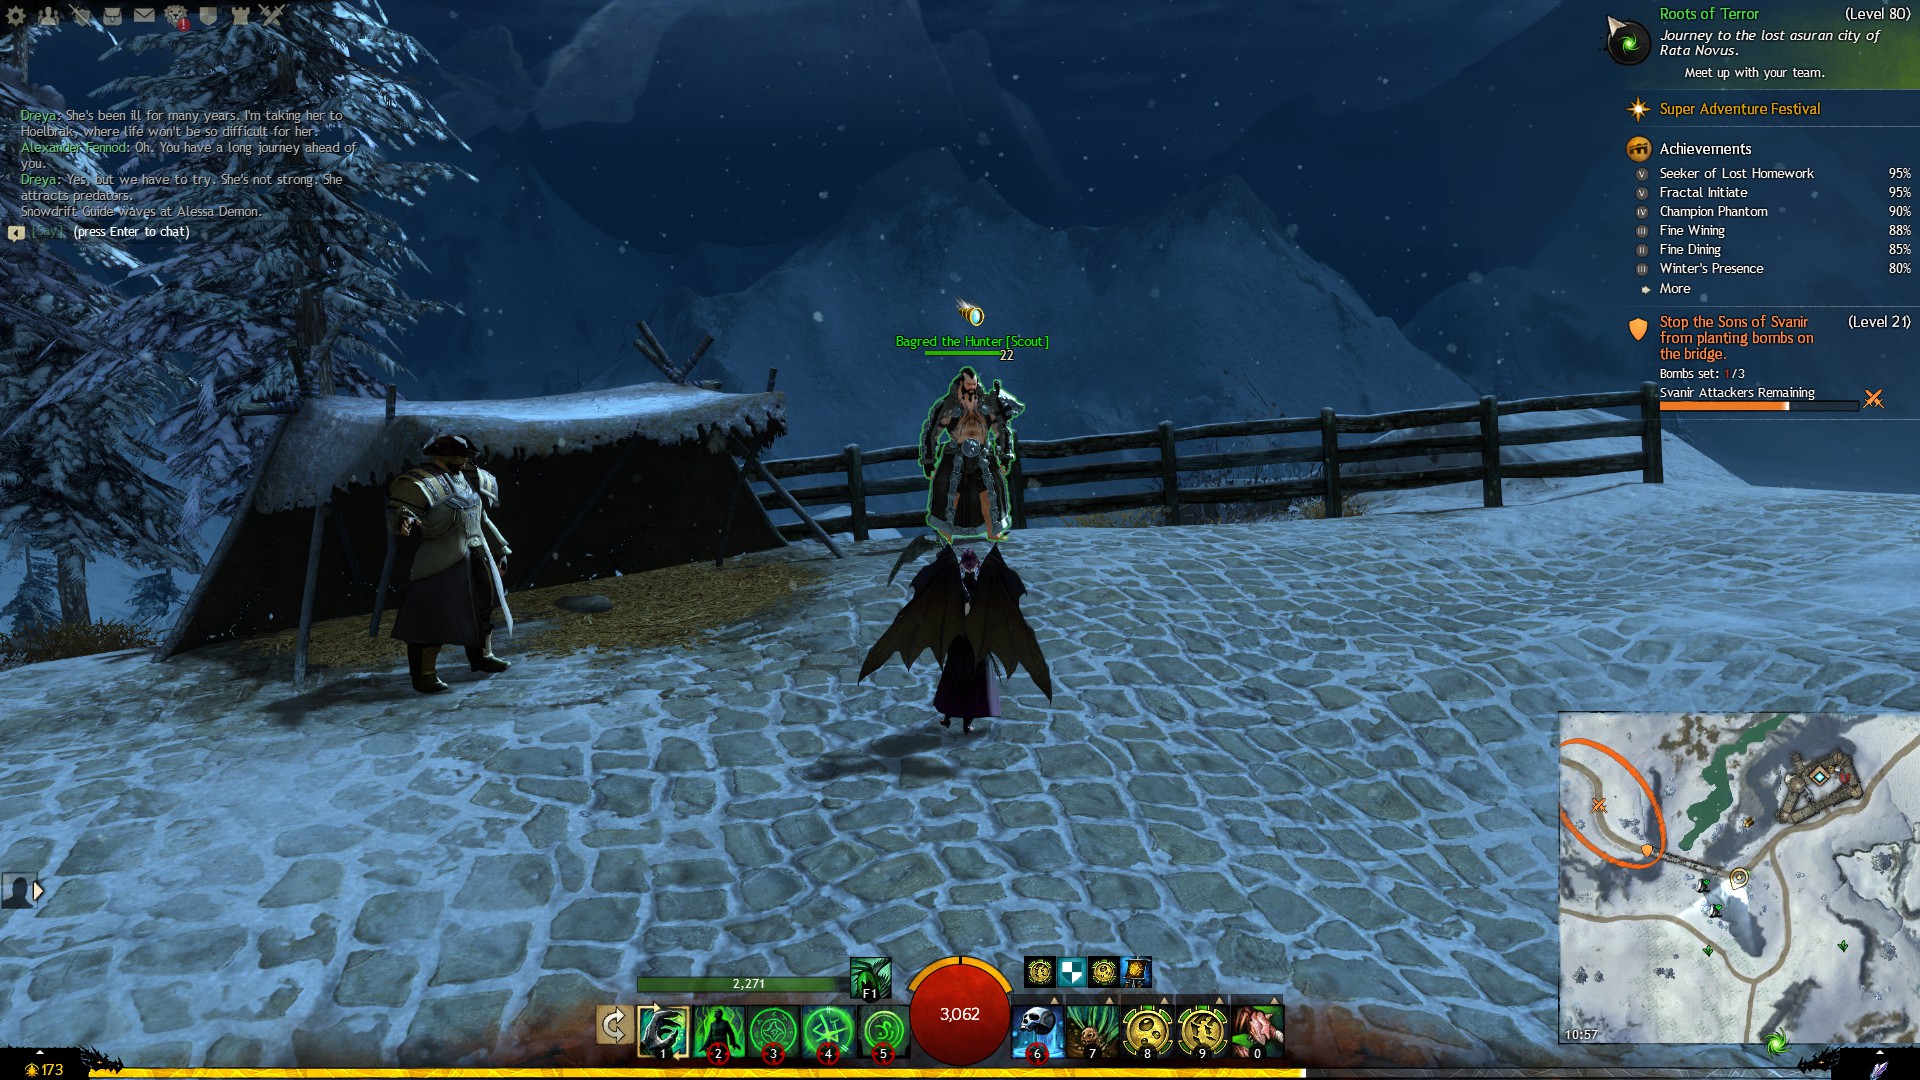
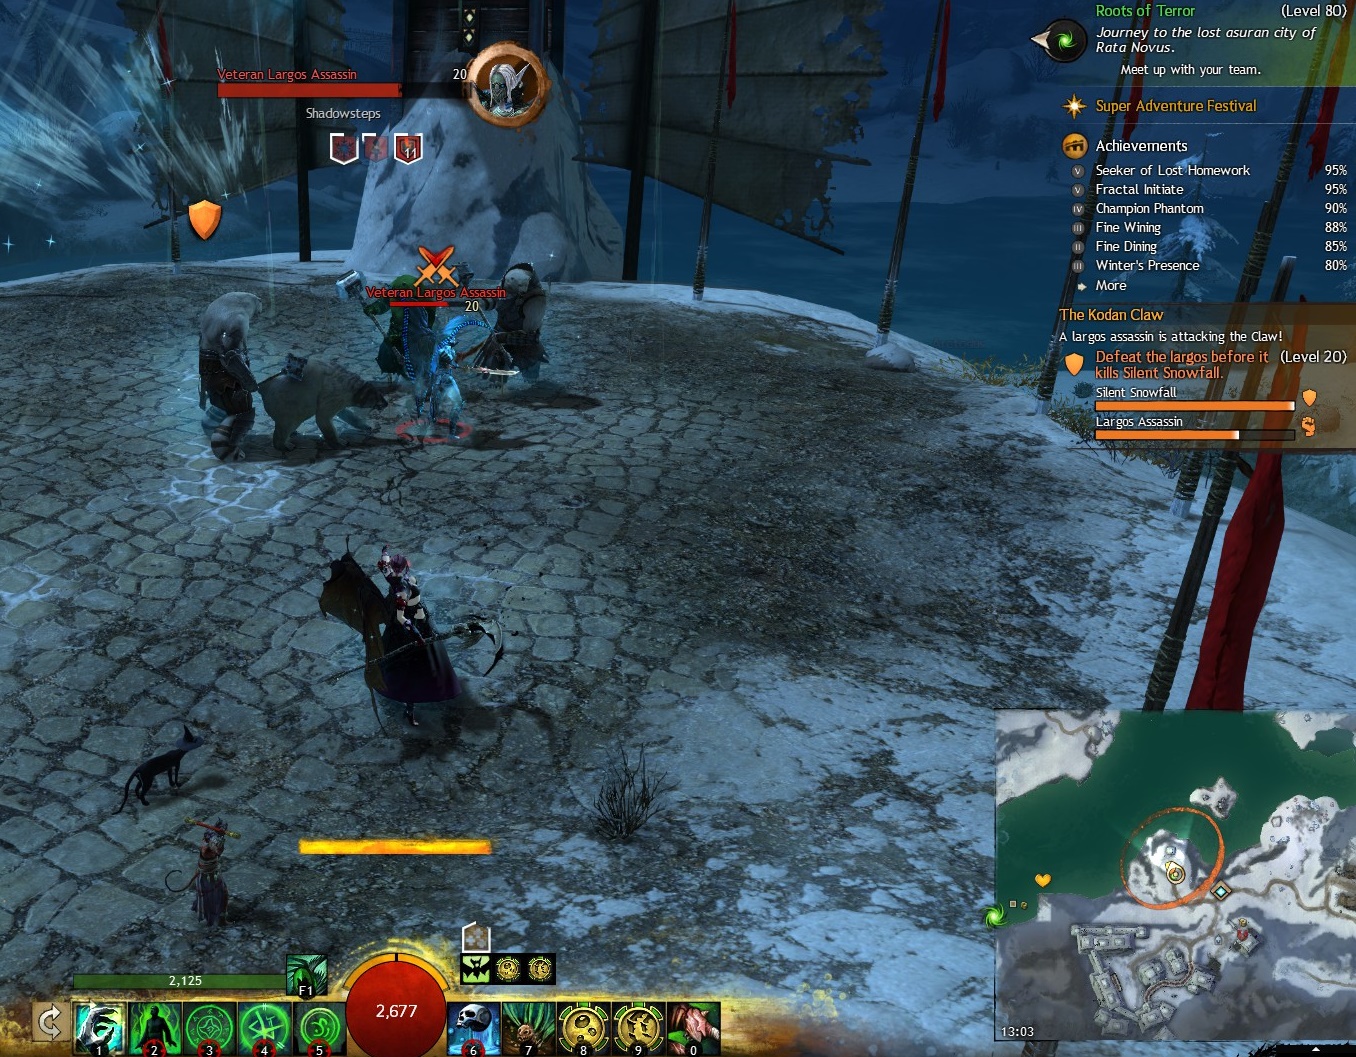
7. Hunter’s Bane. This part of the collection requires you to complete the event “Defeat the largos before it kills Silent Snowfall” in Snowden Drifts. This is the 3rd event in the cycle of this train of events, so if this part isn’t active when you get there just keep completing the events until it progresses to this event or wait until the even cycle resets if there are no events happening at the time.
Completing the Vol 1: The Hunt collection will award you the Chest of the Hunt. This contains Essence of the Hunt and the Recipe: The Hunt (requires level 450 Huntsman to craft). You will now be able to craft The Hunt and here is what you will need:
- 1 Hunter’s Short Bow String (3 Elonian Leather Squares, 100 Memories of Battle, 100 Shards of Glory)
- 1 Hunter’s Short Bow Stave (4 Spiritwood Planks, 100 Memories of Battle, 100 Shards of Glory)
- 1 Legendary Inscription (10 Globs of Ectoplasm, 5 Piles of Crystalline Dust, 1 Orichalcum Plated Dowel, 10 Elonian Leather Squares)
- Essence of the Hunt (from The Chest of the Hunt)
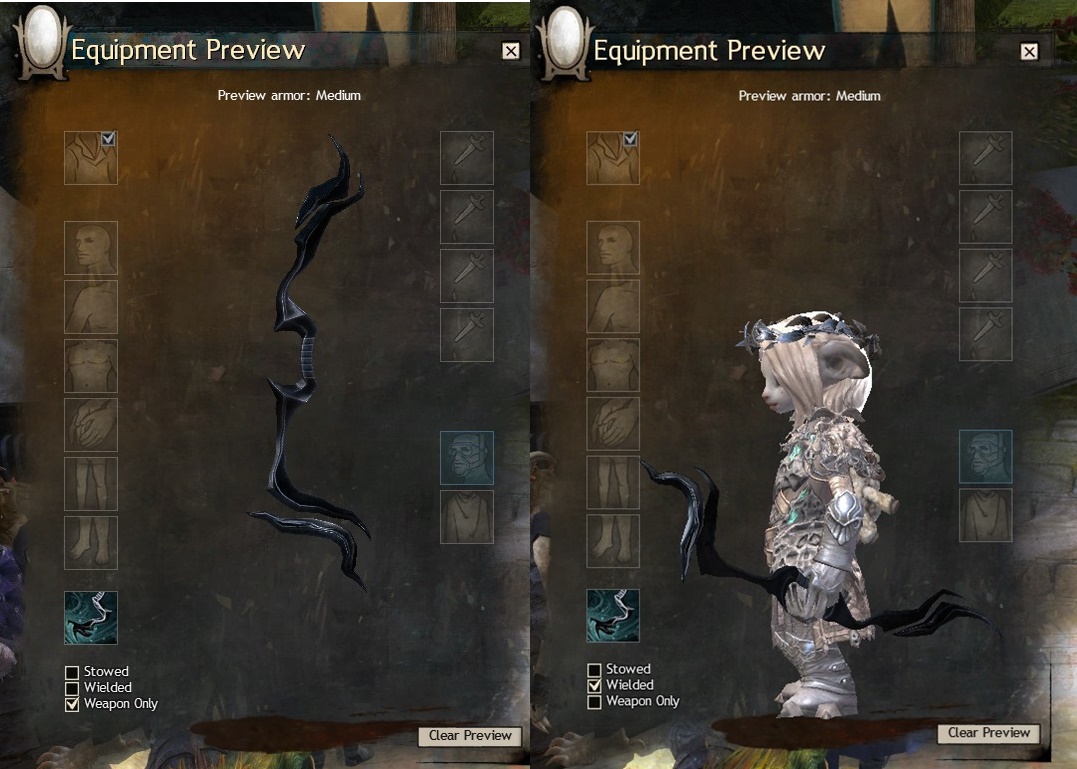
This is what you will get… A very wonky, deformed stick somewhat resembling something that could be a short-bow. Kind of disappointing for the effort, I know, but if you want Chuka and Champawat, it’s what you’ve got to do…
